


hbquikcomjamesl
Well-known member
- Joined
- Mar 1, 2021
- Messages
- 208
It's finished, and thanks to my having tested each subassembly as I completed it, it works.
Here is the microswitch. Even with a cardboard template, I found I had to make multiple adjustments to the bracket, so that the latch would press the switch lever correctly, and the latch spring would clear it. It's stainless steel because that's what was handy in my sheet metal scrap drawer. When the latch is open, the microswitch grounds the wire.
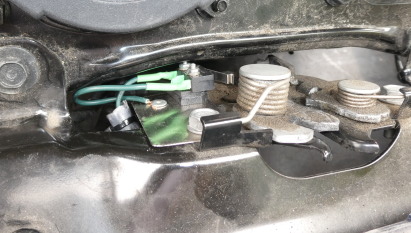
flap ajar microswitch by James Lampert, on Flickr
The wire is (as I noted in another thread) routed through the fender and the door jamb. It's since been covered with Gorilla Tape, and I've brushed a bit of "cold galv" primer on the bare metal at the hole; once my touch-up paint arrives, I'll revisit this area.
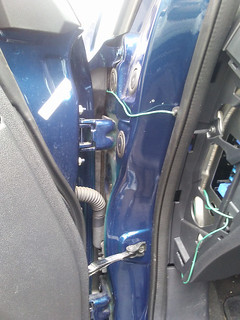
indicator wire routing by James Lampert, on Flickr
The circuit board has the most obnoxious beeper I could find, along with the connections for the indicator light (to the right of the board), and a long wire that taps into the 12V "lighter" socket, so it is only active when the accessory bus is powered up.
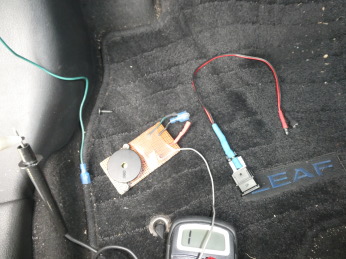
flap ajar components by James Lampert, on Flickr
Finally, the indicator light is the only visible part. It flashes yellow if I power up the car with the flap unlatched. The picture is slightly manipulated; it's not easy to photograph a flashing light, especially during the day.

flap ajar indicator by James Lampert, on Flickr
Here is the microswitch. Even with a cardboard template, I found I had to make multiple adjustments to the bracket, so that the latch would press the switch lever correctly, and the latch spring would clear it. It's stainless steel because that's what was handy in my sheet metal scrap drawer. When the latch is open, the microswitch grounds the wire.
flap ajar microswitch by James Lampert, on Flickr
The wire is (as I noted in another thread) routed through the fender and the door jamb. It's since been covered with Gorilla Tape, and I've brushed a bit of "cold galv" primer on the bare metal at the hole; once my touch-up paint arrives, I'll revisit this area.
indicator wire routing by James Lampert, on Flickr
The circuit board has the most obnoxious beeper I could find, along with the connections for the indicator light (to the right of the board), and a long wire that taps into the 12V "lighter" socket, so it is only active when the accessory bus is powered up.
flap ajar components by James Lampert, on Flickr
Finally, the indicator light is the only visible part. It flashes yellow if I power up the car with the flap unlatched. The picture is slightly manipulated; it's not easy to photograph a flashing light, especially during the day.
flap ajar indicator by James Lampert, on Flickr
")
