OpenEVSE - Open Source Charging Station

My Nissan Leaf Forum

Help Support My Nissan Leaf Forum:

This site may earn a commission from merchant affiliate links, including eBay, Amazon, and others.
MashedPotato said:
- Purchased USBasp programmer and downloaded Windows driver. Programmer came with 10-pin connector, so I made a new cable to connect to the Open EVSE board's 6-pin programmer port.
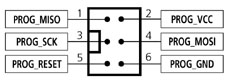
I was asked in a private message about the homemade cable. I took an old ribbon cable (for a floppy drive or an IDE hard drive) and cut it down to six pins, using a dremel with cut-off disk, keeping the the six wires of the ribbon cable attached. The other end of the ribbon cable was cut off, leaving the six wires bare on one end, and attached to a "trimmed" connector on the other end. (This trimmed connector is important, because it will fit in the tight space of the 6-pin port on the OpenEVSE board, where a normal 6-pin connector will not.)

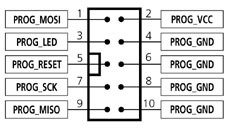
From the 10-pin ribbon cable that came with the USBasp, I removed one of the connector ends and used it for my new cable. The wires need to be lined up properly, and the following pictures should be easier to follow than any explanation I can give.

(Note: If you've never worked with ribbon cable before, practice taking apart the plastic ends and pulling out the ribbon cable from the press-on connectors, then cut the ribbon shorter and see if you can press on the connector again. It's not too difficult.)

Harry

6way_atmel_230.jpg


10way_atmel_230.jpg
 
OK, I am beginning to get the hang of using gitlib.com

From the Master, read the CHANGELOG to find the version, and the associated
Comment, then in the Commits tab, find that comment (because the versions
are missing there), then switch to the associated Branch in the Tree, and finally
switch to the Files tab, and click ZIP to download the associated code files. (gasp)

Simple once one knows how to do it, right? :lol:

Yes, it would be much better to include the version number in the Comment.

But, thanks to those who helped me find my way through this tangled Web. :D
 
In wiring the external lighted button, one just connects the Switch contact
and Ground across the Select switch, and connect the button's LED to +5V?

The current-limiting resistor is built into the lighted switch?
Thanks
 
To make a programming adapter, I got 2x3 and 2x5 crimp connector housings
and some 6-inch wires with pre-crimped Male to Female pins, like these:

http://www.pololu.com/catalog/product/1911" onclick="window.open(this.href);return false;
http://www.pololu.com/catalog/product/1913" onclick="window.open(this.href);return false;
http://www.pololu.com/catalog/product/1801" onclick="window.open(this.href);return false;

Then, with no soldering, one can assemble the cable using the pin-outs
described above.

Are these pins as seen from the wire side of the connectors,
or as seen from the pin/hole side of the connectors?
Thanks, Gary

NOTE:
I made a straight-through 6-wire Male to Female adapter cable with a 2x3
on each end to adapt the "fat" Female 2x3 on the TinyUsbISP to the "skinny"
Male 2x3 on the OpenEVSE board.
 
garygid said:
In wiring the external lighted button, one just connects the Switch contact
and Ground across the Select switch, and connect the button's LED to +5V?

The current-limiting resistor is built into the lighted switch?
Thanks

Yes, you are correct for the switch contact.

I'm not sure for the plus board version if you have the header LED1 as the DIY v4 board has. This signal is basically the relay ON signal so when the button is LIT, i know the relay is connected and power is flowing through. R23 on the v4 board is the current limiting resistor and the calculated 330ohms is a good value to keep the ring not overly bright like all BLUE leds.
 
Chris,
How do you recommend connecting the lighted button
in the OpenEVSE Plus workshop projects?
Thanks, Gary

Your Princess is Precious, but I suspect that you already know that.
Thanks for bringing your family along last Saturday.
 
On the OpenEVSE Plus board, one side of the 1x2 "test" Male header
is connected to ground. What is the other side connected to?

Could this "test" pin be connected to the Control Pilot to easily
attach your EV Simulator board, or a scope lead?
 
garygid said:
Chris,
How do you recommend connecting the lighted button
in the OpenEVSE Plus workshop projects?
Thanks, Gary

Your Princess is Precious, but I suspect that you already know that.
Thanks for bringing your family along last Saturday.

3 wire .1" jumper. 5v to LED +, GND to LED - and 1 side of NO and the 3rd wire to select. The LED button from adafruit includes a current limiting resistor.

It was our pleasure to join the gathering... The girls wore me out shopping after.
 
Ingineer said:
Nice Yazaki 30A handles/cords for $100 on Ebay.

-Phil

That's not bad, the Leviton 30A cables are down to $134 as well
http://store.leviton.com/Electric-Vehicle-Charge-Connector-A3435-PEV/dp/B00912OT00?field_availability=-1&field_browse=5742800011&field_product_site_launch_date_utc=-1y&id=Electric+Vehicle+Charge+Connector+A3435-PEV&ie=UTF8&refinementHistory=brandtextbin%2Csubjectbin%2Ccolor_map%2Cprice%2Csize_name&searchNodeID=5742800011&searchPage=1&searchRank=salesrank&searchSize=12#.UO5mNHy9KSM" onclick="window.open(this.href);return false;
 
Ingineer said:
Nice Yazaki 30A handles/cords for $100 on Ebay.

-Phil

I'm planning on building a 32 amp Open EVSE, can these 30 amp assemblies be used or upgraded? I assume the rating is based on the cable's wire gauge and length and not the plug rating.
 
borland said:
I'm planning on building a 32 amp Open EVSE, can these 30 amp assemblies be used or upgraded? I assume the rating is based on the cable's wire gauge and length and not the plug rating.
do not exceed the published rating of any components because an electrical fire is the last thing you want in your home.
 
ENIAC said:
z0ner said:
Ingineer said:
Nice Yazaki 30A handles/cords for $100 on Ebay.

-Phil

Thanks Phil, although it's now $125. Bait/switch after 7 people purchased @ $100. Damn capitalism!
The description says, "These came 2 to a box but can be purchased individually". Is it two for $125?

I think the eBay seller is trying to explain his "New other (see details)" listing category... eBay defines it as...

"New other (see details)

A new, unused item with absolutely no signs of wear. The item may be missing the original packaging, or in the original packaging but not sealed. The item may be a factory second or a new, unused item with defects. See the seller's listing for full details and description of any imperfections."

Course he may mean something else too.
 
So Phil/Ingineer any suggestions on some good ways to tap into the J1772 harness so that an EVSE + cord reel could be mounted in the car? What I really want is to be able to buy and terminate the male/female connector on the J1772 pigtail so I can make my own harness that doesn't require modifying the car but have had no luck finding a source for the connectors.
 
I'm just starting to read about the OpenEVSE project. It sounds like a great little side project ;)

But, is there any sort of surge suppression in the OpenEVSE design? I haven't spent a great deal of time poring over the schematics and design, but I don't see anything there.
 
I think my OpenEVSE is now completely functional thanks to the help and advice of many. GlennD diagnosed my display problem as a faulty unit (the shield was good). The new display works great. Glenn also flashed my OpenEVSE with version 1.09 (Messerschmitt or PT?).

The unit tests fine for States A - F. I don't have the equipment to test the frequency or the pilot duty cycle though.

Thanks again to all who have been developing this and improving it. It was a lot of fun and a good education building it. Hope to make a 75A in the future. Why? "Because it is there!"
 
Back
Top