denwood
Well-known member
I purchased a 2018 LEAF SL about 18 months back from a local driving school that ironically had used the same car to teach my daughter ") It was a leased car, so I'm pretty sure the brake fluid was never flushed, and I know for sure that the pads/caliper pins had never been serviced. I've been using a Motive pressure bleeder on our other cars, but could not find a cap from them to fit the 2018 (2 prong) LEAF master reservoir. I finally found one reseller "SpeediBleed.com" which stocked a cap for the LEAF (C1000 kit) so ordered this up with a few extra quick release fittings (male 1/8" NPT) to convert my Motive caps over to this system. Motive pressure bleeders need to be pumped up manually, but SpeediBleed includes a fitting to pull pressure from a tire and a regulator to set pressure.
It was a leased car, so I'm pretty sure the brake fluid was never flushed, and I know for sure that the pads/caliper pins had never been serviced. I've been using a Motive pressure bleeder on our other cars, but could not find a cap from them to fit the 2018 (2 prong) LEAF master reservoir. I finally found one reseller "SpeediBleed.com" which stocked a cap for the LEAF (C1000 kit) so ordered this up with a few extra quick release fittings (male 1/8" NPT) to convert my Motive caps over to this system. Motive pressure bleeders need to be pumped up manually, but SpeediBleed includes a fitting to pull pressure from a tire and a regulator to set pressure.
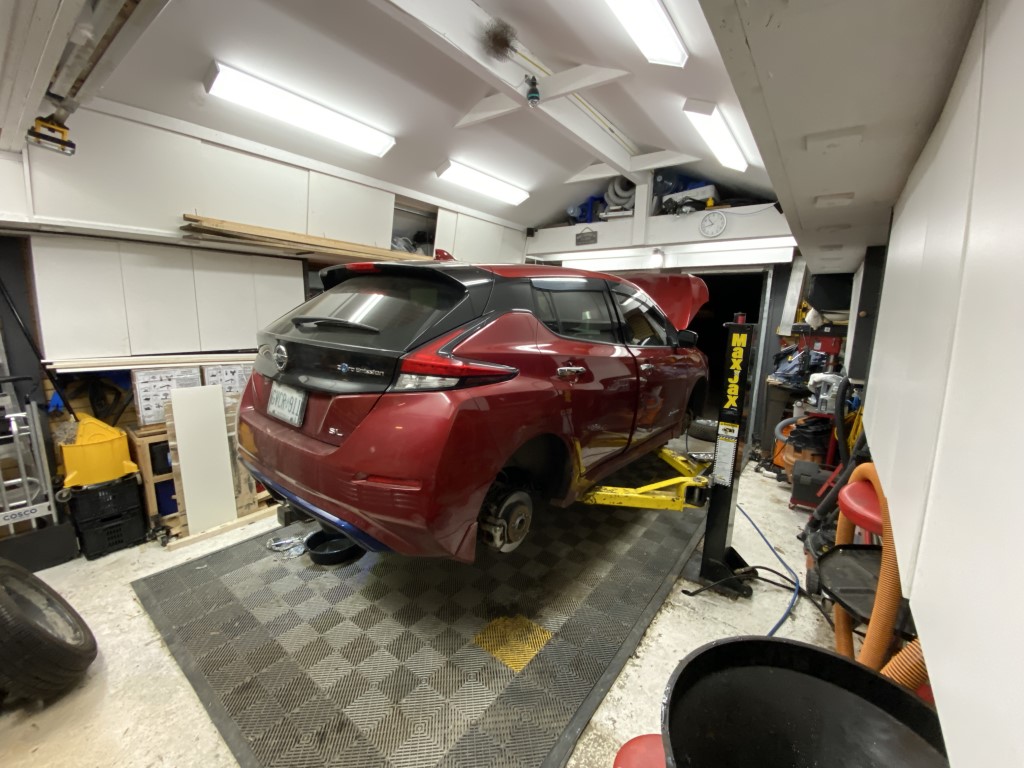
The car was up on the hoist for winter/summer tire swap, so it was a perfect time for brake service. Before doing the brake service on a 2018 LEAF you should turn ePedal option off (so brake pressure is not applied when you park, then turn the car off. Don't apply the ebrake. Wait 3 minutes with everything off, doors closed, then disconnect the 12V battery.
I decided to use BOSCH ES16-N32 DOT 5.1 fluid instead of OEM DOT 3 specifically due to the much lower viscosity of the DOT 5.1 fluid at -40C. We see temps approaching that here in winter. The 670 mm2/2 kinematic viscosity of the BOSCH DOT 5.1 fluid is much less than the the DOT 3 spec at 1500 mm2/s at -40C which means the LEAF electronic braking system should perform much better at very cold temps with the DOT 5.1. I also researched the fluid (actually the US military did) and posted my findings here: https://bobistheoilguy.com/forums/threads/brake-fluid-military-testing-dot-3-v-dot-4-vs-dot-5-1.354498/
Any concerns I had about seals, corrosion, performance etc. went away with the those study results on the DOT 5.1 vs 3. If you did want to stick with DOT 3, then 100% you should use AC DELCO Brake and Clutch Fluid (GM OEM) which has very low cold temp viscosity (much better then the DOT 3 spec) and lower water absorption as well. That fluid is actually made by DOW, DOW 372LB. See the study I linked above on the DOW DOT 3 low viscosity fluid testing results.
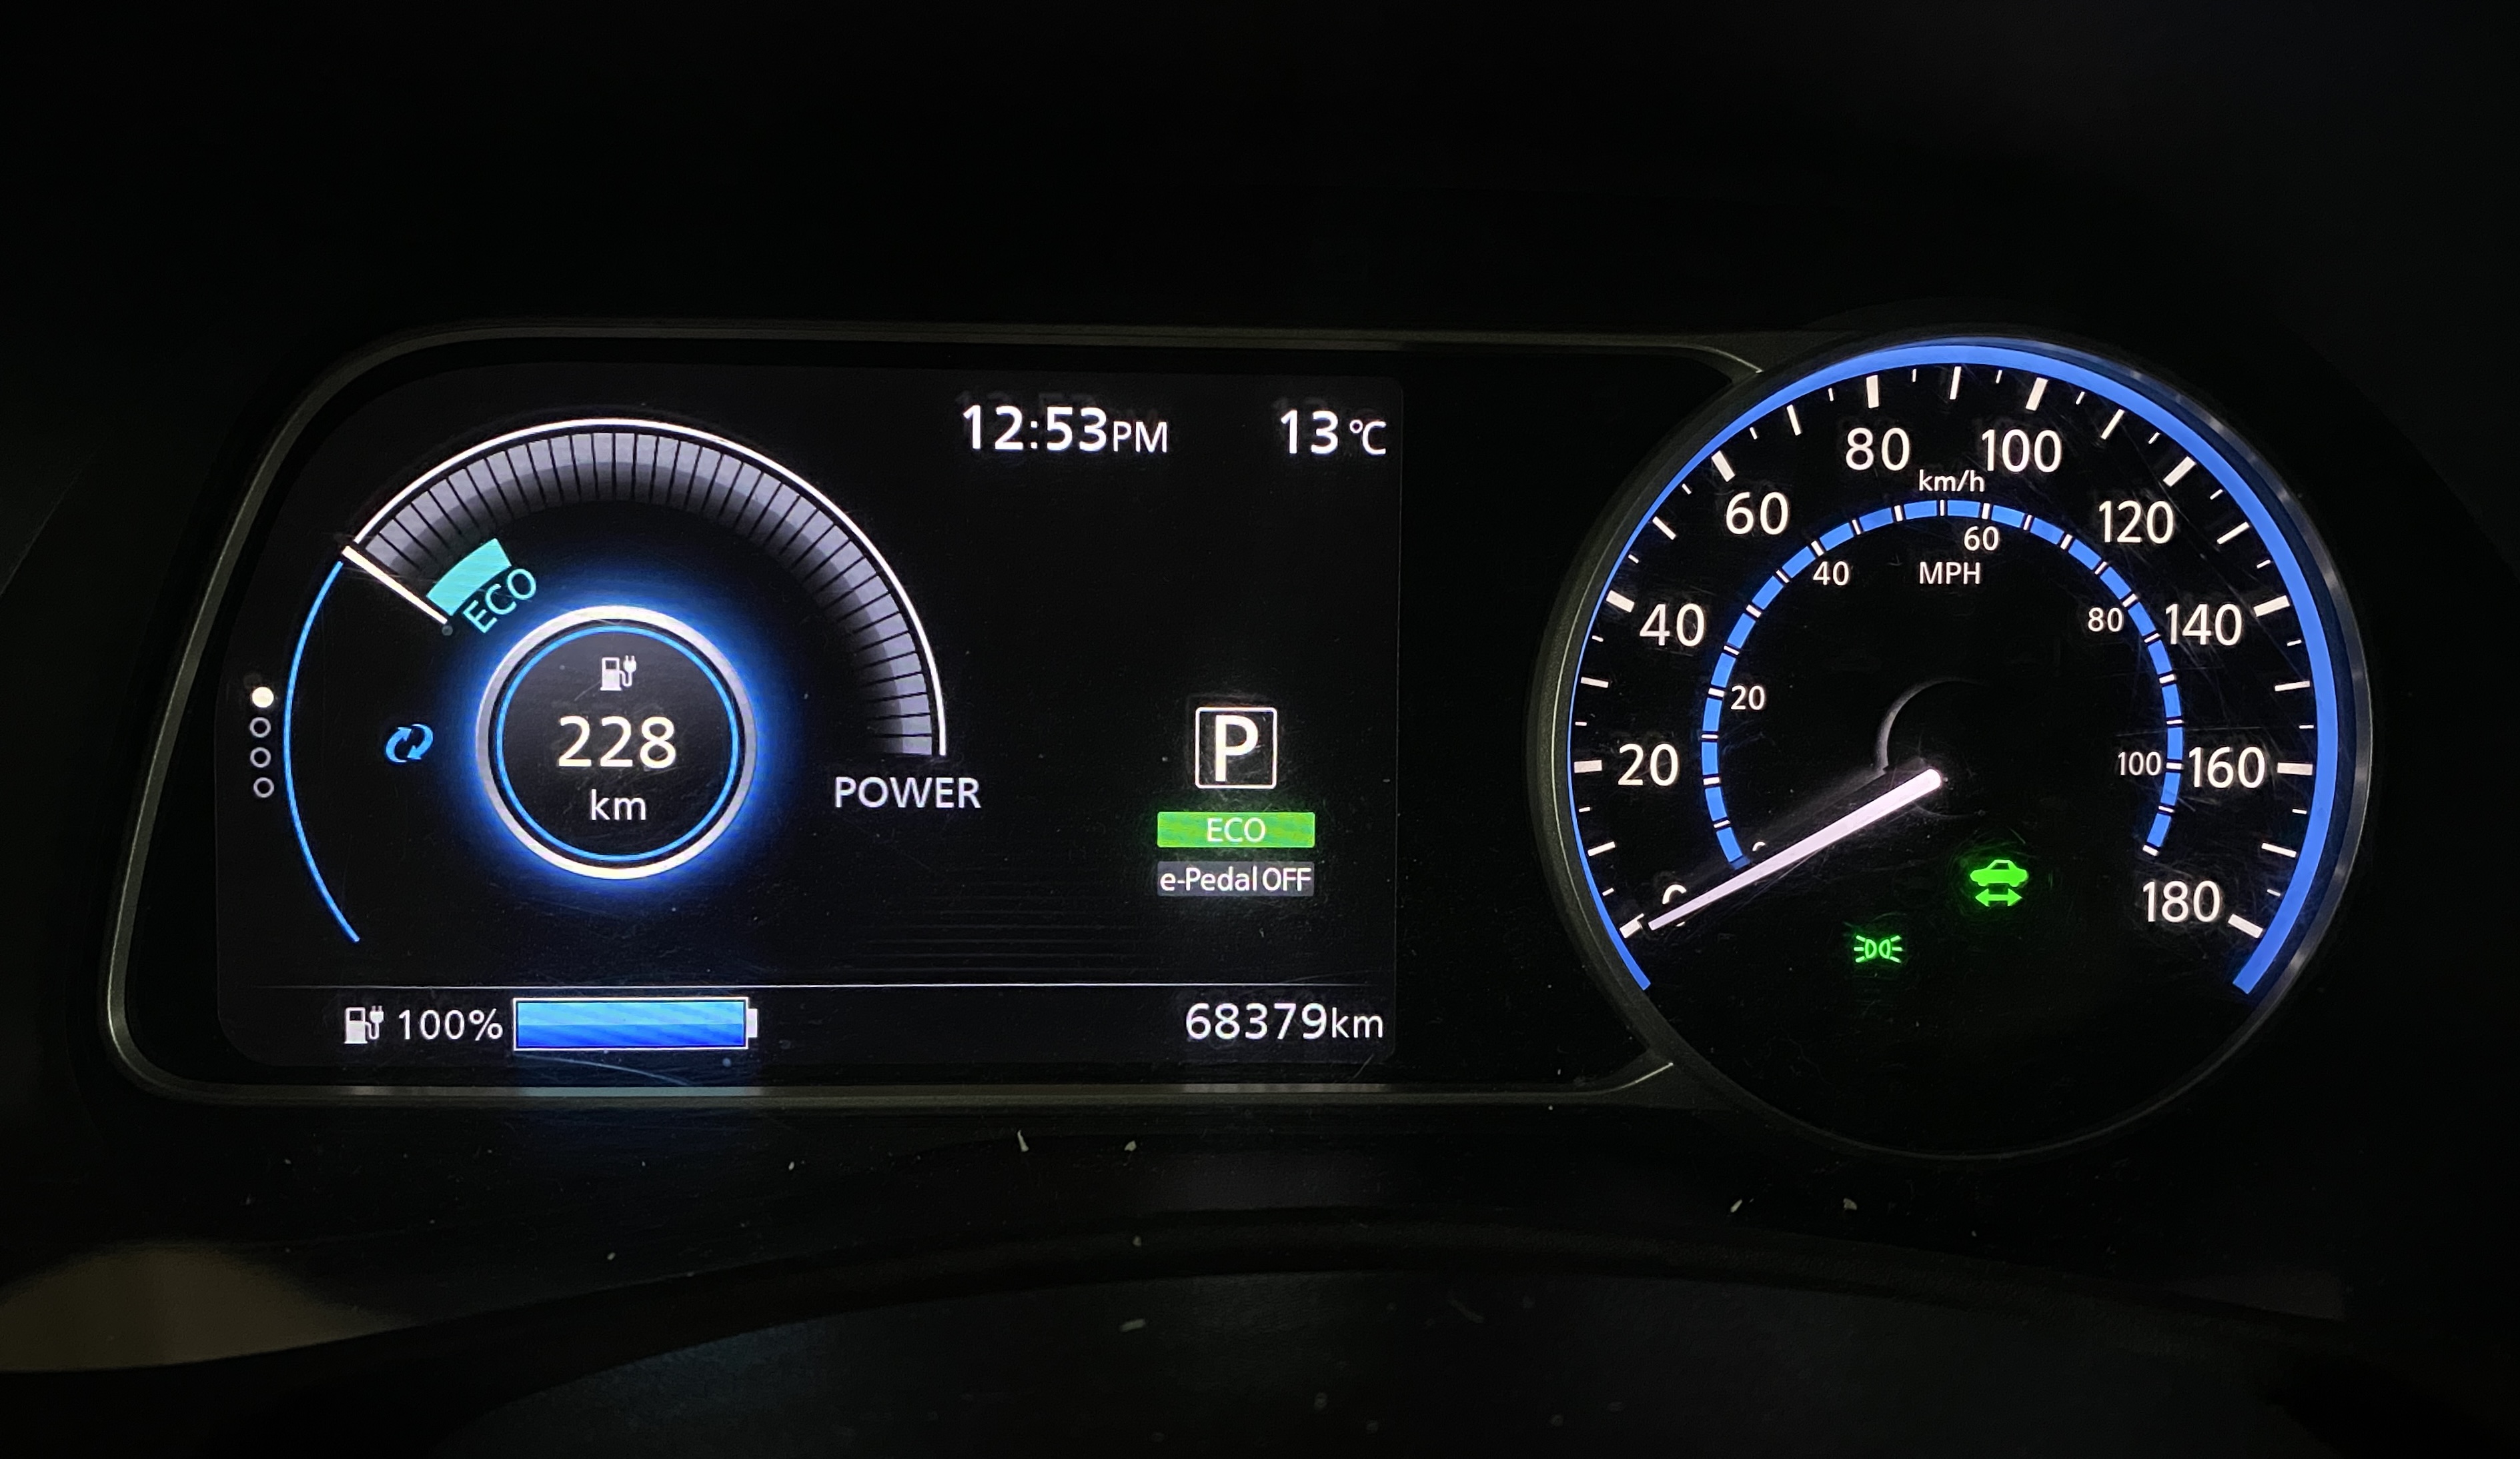
I rarely charge to 100% but apparently had turned the charge timer off (it was only supposed to go for four hours) and the car topped itself off. I guess time for a BMS calibration..ha.
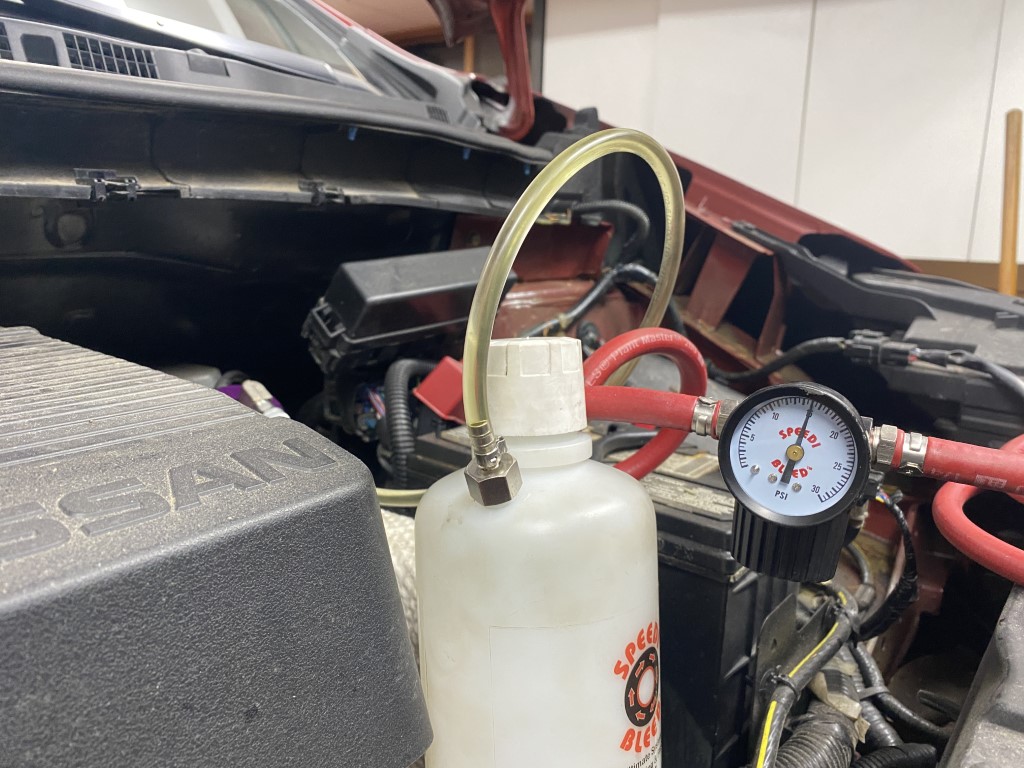
This is the SpeediBleed connected with a litre of Bosch 5.1 fluid added to the bottle. I had some air bubbles exiting the pressure bottle due to a tiny split in the pickup tube inside the bottle. I just removed the threaded fitting and swapped the internal fluid pickup tube end to end to resolve this. You should see zero air bubbles in the fluid leaving the pressure bottle! Keep on eye on the fluid level and make sure the master cylinder stays full. Running it dry will cause you major headaches in some cars, like my Audi A3 as I got air in the ABS system. It took 3 hours of repeated bleeding, using a laptop and VAG software to run the ABS bleed sequence.
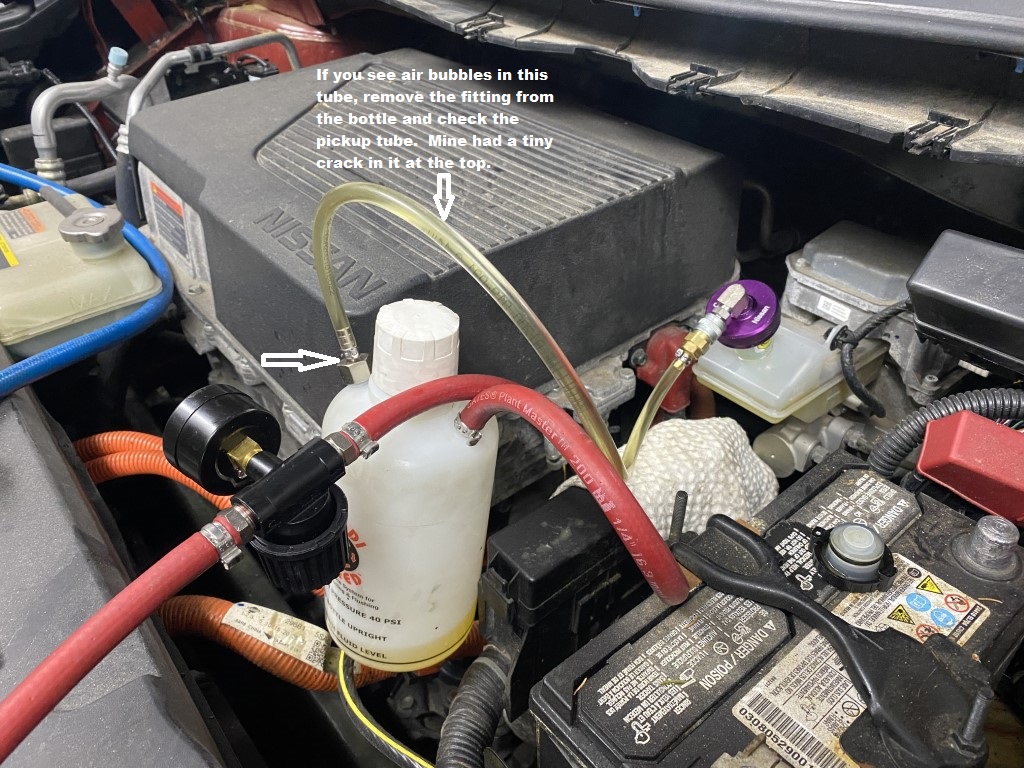
The Speedibleed comes with a connection to pressurise via a tire, but I removed that and replaced with a standard air fitting so I just use my shop air. The unit comes with a nice little regulator so you can dial in 15 PSI. Going higher is not a good idea with a plastic reservoir!
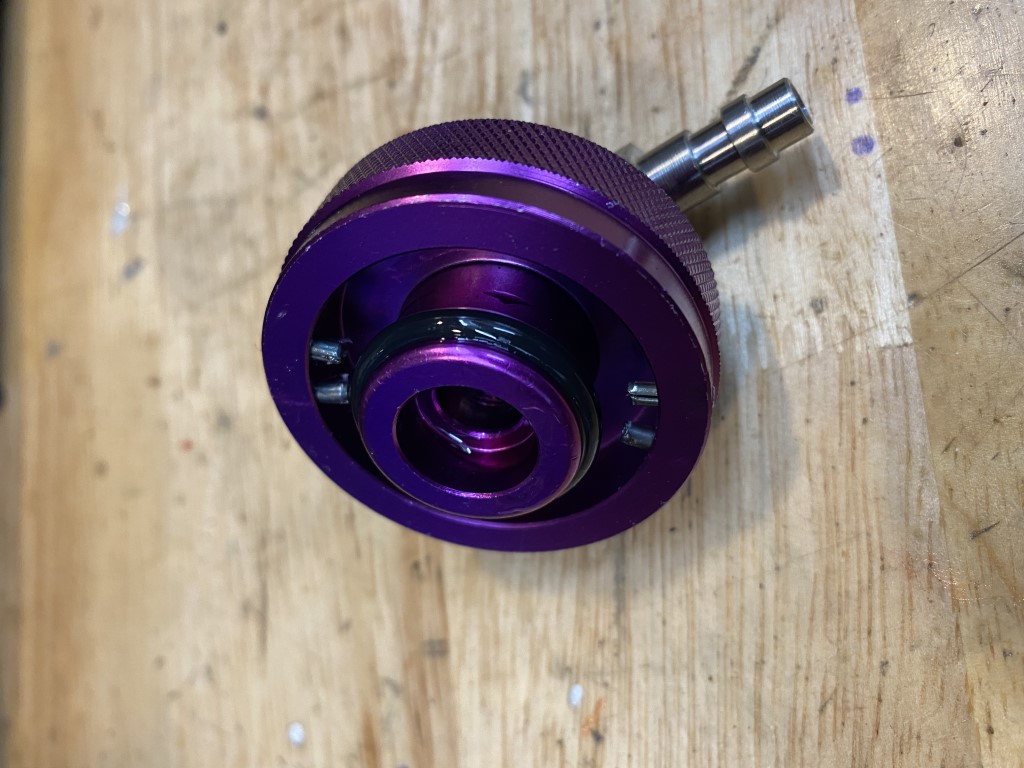
SpeediBleed sells this slick little adapter (Motive does not) for late model Nissan LEAF (C1000 model cap) and like all their caps incorporates a 1/8" NPT quick release. I ordered some additional male 1/8" NPT fittings to convert my other caps to this unit. The gen 2 (2018 and up) LEAF uses a 2 prong cap, which is not the same cap as a 2011-2017 model.
With pressure on the cap, you just need to go to each corner and let the brake fluid flush via the bleed screw. I use the sequence FL, RR, FR, RL so "old" fluid is flushed out via the shortest path first. With the Speedibleed unit, you just set the air pressure at the regulator and let it go. With the Motive you need to pump it up frequently to build pressure which is a PITA on the hoist.
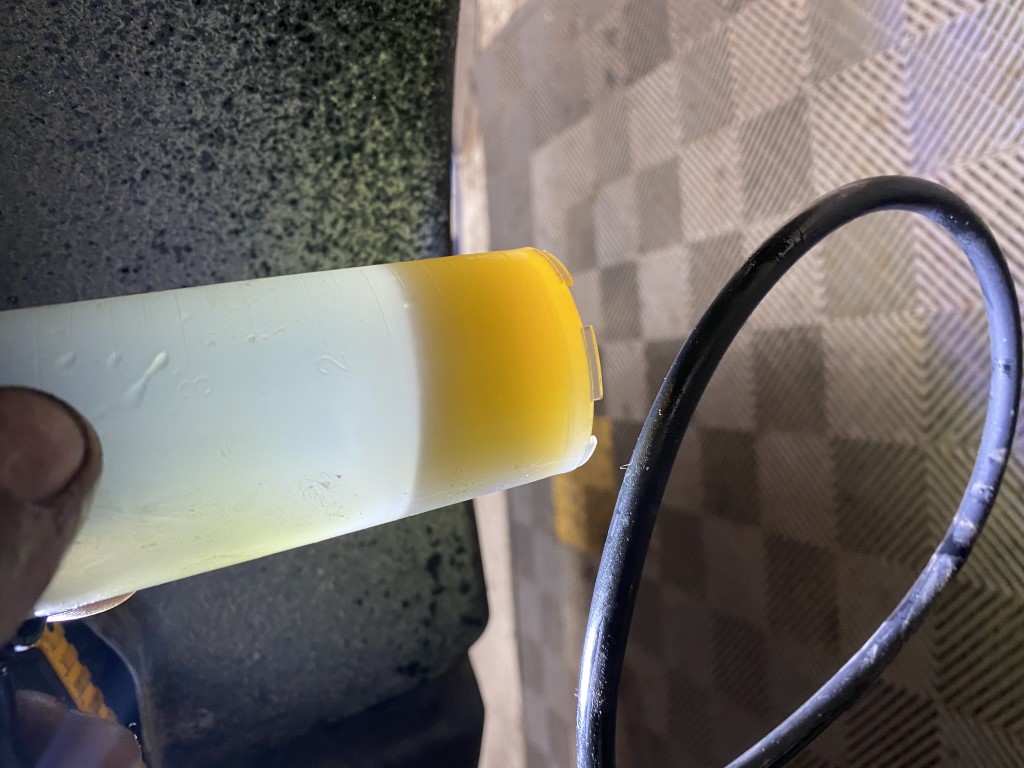
The OEM DOT 3 (likely 4 years old) tested at around 1% water, and looked a bit cloudy, but not terrible coming out.
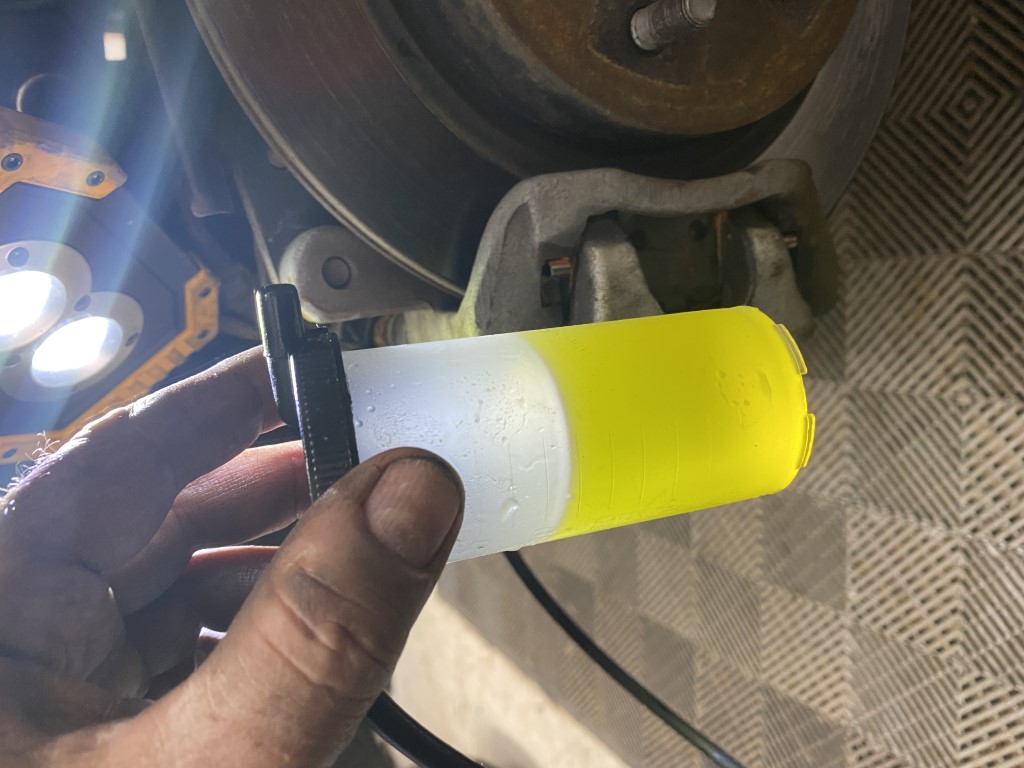
Bosch ES16 DOT 5.1 fluid has a yellow tinge, but you can tell it's fresh more or less by how clear it is. I ran about a litre through the system in total.
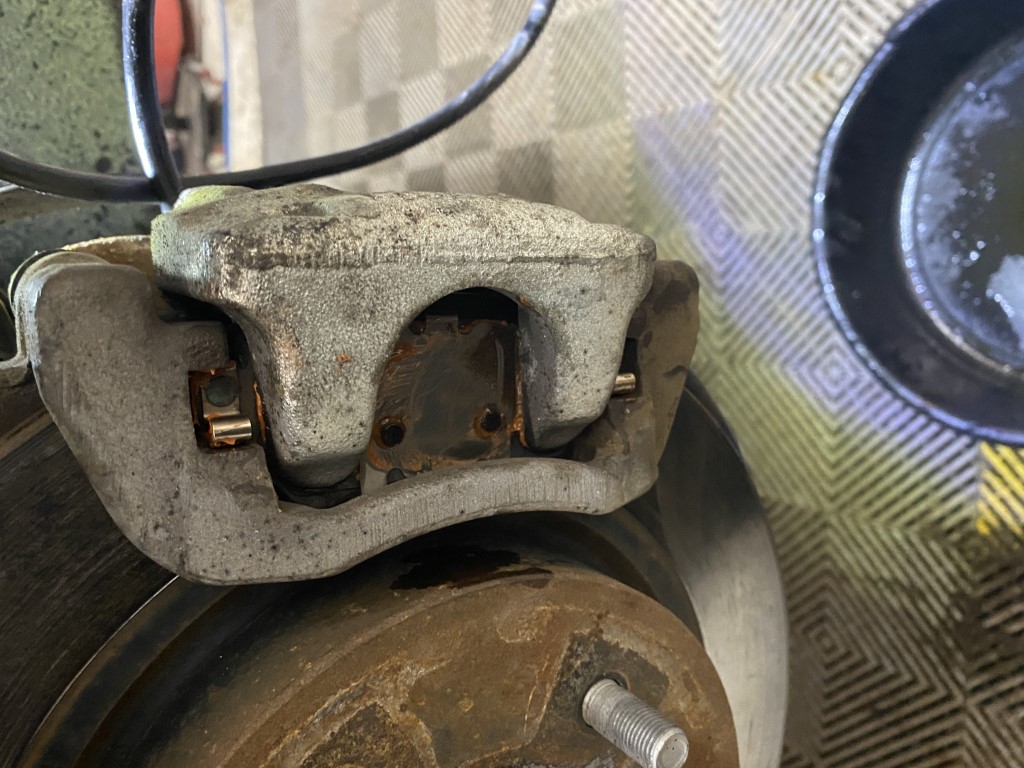
I used Permatex Silicon/Ceramic (Orange) brake lube on the pins, shims and caliper/brake contact points. The LEAF has never had a proper brake service evidently (it was a leased car previously) as both rear inner pads were pretty stuck and took some tapping and prying to remove them. Same thing with one of the front inner pads. Correct lube and cleaning will prevent this, increase your EV efficiency and improve braking as well. I have not always removed pads during brake service (doing the caliper slide pins yearly) but I will now. The rear brakes on a LEAF don't see much use or heat for that matter...so the pad cleaning/lube part of service becomes even more important.
Torquing the 14mm caliper slide bolts to about 26 ft/lbs will do the trick. You should check the 17mm caliper frame bolts to make sure they are least at 85 ft/lbs. I use anti-seize on both the caliper and frame bolts (we see a lot of winter salt) so back these numbers back a tad as "wet" torque specs are always less. In non corrosive environments you'd likely want to use loctite red on the 17mm frame bolts and blue on the 14mm caliper slide bolts.
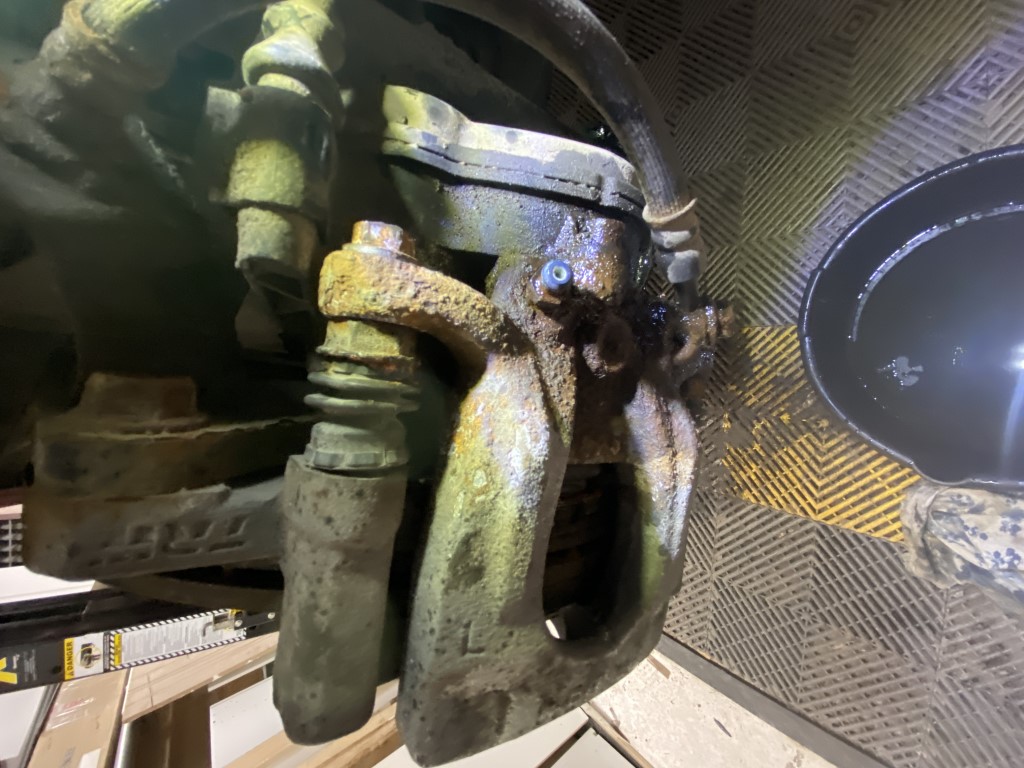
If your car has an electronic ebrake (the 2018 LEAF SL has one) then don't try and retract the rear caliper pistons! You'd need to remove the actuator motor from the caliper and wind the ebrake back to do that. There are a few Youtube vids out there on how to do this manually without the OEM software. The OEM software will allow you to wind back the internal ebrake actuator by controlling the ebrake motor from the software which is obviously a bit nicer than removing the ebrake motors
It was a leased car, so I'm pretty sure the brake fluid was never flushed, and I know for sure that the pads/caliper pins had never been serviced. I've been using a Motive pressure bleeder on our other cars, but could not find a cap from them to fit the 2018 (2 prong) LEAF master reservoir. I finally found one reseller "SpeediBleed.com" which stocked a cap for the LEAF (C1000 kit) so ordered this up with a few extra quick release fittings (male 1/8" NPT) to convert my Motive caps over to this system. Motive pressure bleeders need to be pumped up manually, but SpeediBleed includes a fitting to pull pressure from a tire and a regulator to set pressure.The car was up on the hoist for winter/summer tire swap, so it was a perfect time for brake service. Before doing the brake service on a 2018 LEAF you should turn ePedal option off (so brake pressure is not applied when you park, then turn the car off. Don't apply the ebrake. Wait 3 minutes with everything off, doors closed, then disconnect the 12V battery.
I decided to use BOSCH ES16-N32 DOT 5.1 fluid instead of OEM DOT 3 specifically due to the much lower viscosity of the DOT 5.1 fluid at -40C. We see temps approaching that here in winter. The 670 mm2/2 kinematic viscosity of the BOSCH DOT 5.1 fluid is much less than the the DOT 3 spec at 1500 mm2/s at -40C which means the LEAF electronic braking system should perform much better at very cold temps with the DOT 5.1. I also researched the fluid (actually the US military did) and posted my findings here: https://bobistheoilguy.com/forums/threads/brake-fluid-military-testing-dot-3-v-dot-4-vs-dot-5-1.354498/
Any concerns I had about seals, corrosion, performance etc. went away with the those study results on the DOT 5.1 vs 3. If you did want to stick with DOT 3, then 100% you should use AC DELCO Brake and Clutch Fluid (GM OEM) which has very low cold temp viscosity (much better then the DOT 3 spec) and lower water absorption as well. That fluid is actually made by DOW, DOW 372LB. See the study I linked above on the DOW DOT 3 low viscosity fluid testing results.
I rarely charge to 100% but apparently had turned the charge timer off (it was only supposed to go for four hours) and the car topped itself off. I guess time for a BMS calibration..ha.
This is the SpeediBleed connected with a litre of Bosch 5.1 fluid added to the bottle. I had some air bubbles exiting the pressure bottle due to a tiny split in the pickup tube inside the bottle. I just removed the threaded fitting and swapped the internal fluid pickup tube end to end to resolve this. You should see zero air bubbles in the fluid leaving the pressure bottle! Keep on eye on the fluid level and make sure the master cylinder stays full. Running it dry will cause you major headaches in some cars, like my Audi A3 as I got air in the ABS system. It took 3 hours of repeated bleeding, using a laptop and VAG software to run the ABS bleed sequence.
The Speedibleed comes with a connection to pressurise via a tire, but I removed that and replaced with a standard air fitting so I just use my shop air. The unit comes with a nice little regulator so you can dial in 15 PSI. Going higher is not a good idea with a plastic reservoir!
SpeediBleed sells this slick little adapter (Motive does not) for late model Nissan LEAF (C1000 model cap) and like all their caps incorporates a 1/8" NPT quick release. I ordered some additional male 1/8" NPT fittings to convert my other caps to this unit. The gen 2 (2018 and up) LEAF uses a 2 prong cap, which is not the same cap as a 2011-2017 model.
With pressure on the cap, you just need to go to each corner and let the brake fluid flush via the bleed screw. I use the sequence FL, RR, FR, RL so "old" fluid is flushed out via the shortest path first. With the Speedibleed unit, you just set the air pressure at the regulator and let it go. With the Motive you need to pump it up frequently to build pressure which is a PITA on the hoist.
The OEM DOT 3 (likely 4 years old) tested at around 1% water, and looked a bit cloudy, but not terrible coming out.
Bosch ES16 DOT 5.1 fluid has a yellow tinge, but you can tell it's fresh more or less by how clear it is. I ran about a litre through the system in total.
I used Permatex Silicon/Ceramic (Orange) brake lube on the pins, shims and caliper/brake contact points. The LEAF has never had a proper brake service evidently (it was a leased car previously) as both rear inner pads were pretty stuck and took some tapping and prying to remove them. Same thing with one of the front inner pads. Correct lube and cleaning will prevent this, increase your EV efficiency and improve braking as well. I have not always removed pads during brake service (doing the caliper slide pins yearly) but I will now. The rear brakes on a LEAF don't see much use or heat for that matter...so the pad cleaning/lube part of service becomes even more important.
Torquing the 14mm caliper slide bolts to about 26 ft/lbs will do the trick. You should check the 17mm caliper frame bolts to make sure they are least at 85 ft/lbs. I use anti-seize on both the caliper and frame bolts (we see a lot of winter salt) so back these numbers back a tad as "wet" torque specs are always less. In non corrosive environments you'd likely want to use loctite red on the 17mm frame bolts and blue on the 14mm caliper slide bolts.
If your car has an electronic ebrake (the 2018 LEAF SL has one) then don't try and retract the rear caliper pistons! You'd need to remove the actuator motor from the caliper and wind the ebrake back to do that. There are a few Youtube vids out there on how to do this manually without the OEM software. The OEM software will allow you to wind back the internal ebrake actuator by controlling the ebrake motor from the software which is obviously a bit nicer than removing the ebrake motors