Broken nav touch screen in 2014 Leaf

My Nissan Leaf Forum

Help Support My Nissan Leaf Forum:

This site may earn a commission from merchant affiliate links, including eBay, Amazon, and others.

sdmike1

Active member
Joined
Apr 25, 2014
Messages
32
Hi guys. I'm hoping there's a way to replace the touch screen or LCD on the navigation screen without replacing the whole unit. As expected, the dealer wants thousands of dollars to swap it out. The screen broke when an item rushed forward during hard braking, smacking the screen head on. The display still works, but the touch screen does not. It's basically shattered, but there's no other damage

There's another thread here that explains how an owner was able to replace the glass on his 2012 Leaf at a cost of just $22.00 for the touch screen, but later in the thread another owner said the part numbers provided didn't work with his 2013. I suspect the same with my 2014.

http://www.mynissanleaf.com/viewtopic.php?t=10828

Does anyone have any advice or links to parts needed to fix this? It looks like PacParts.com sells replacement screens, but I don't know the model number of the unit (I'm assuming it's still a Clarion, but I'm not sure) for the 2014.

Thanks in advance for any help.
 
Ok...here's what I came up with. Hopefully an expert on here can tell me if I'm barking up the wrong tree or not. I did a search for a replacement unit for my VIN and it came back as 259154NE0A as the model number. When I went to PacParts and put in this number, it actually identified the unit as a Clarion QY7210NK, and provided a list of replacement parts here:

http://www.pacparts.com/model.cfm?model_id=QY7210NK&mfg=Clarion&back=0&action=list_part

Now having said that, it appears that there may be lots and lots of versions of this unit. I suspect that those are all plug compatible, but I can't be sure. There's a seller on eBay selling several of the units for $299 each and they all look the same but with slightly different model numbers. Like with most car parts I"m assuming there are just newer versions of this throughout the model year. Anyway, since I'm not trusting someone who only sold vitamin supplements to actually SEND me a $3,000 unit for $299, I think I'll stick with trying to fix the parts. The touch screen is part 930780640977, and you can see in the link below that it's used for lots of units. I guess it's pretty safe that this is the right one.

http://www.pacparts.com/part.cfm?sku=930780640977

Again, any input would be appreciated.
 
My center console had a GPS problem. The dealer sent it in to be repaired. Cost was $150 to the dealer and $580 to the repair place. This might work for you even though you problem is different.
 
THis is the touch screen for the 2014 Leaf. You can see that it fits several models of LCD

http://www.pacparts.com/part.cfm?sku=930780640977
 
ok guys, I can confirm that that part works in my 2014! Best $25 I ever spent. Here are the instructions for how to replace the touch screen. It's not hard, just need to be careful. It took me about 90 minutes the first time, then 30 minutes when I had to take it apart again to fix a mistake.

READ ALL THE DIRECTIONS BEFORE STARTING

You will need: a medium-sized Philips screw driver, a tiny Phillips screw driver. Both should be magnetized in advance (slide the screw driver back and forth a dozen times on a very strong magnet). Also, a tiny flat head screw driver for releasing ribbon cables and tabs, and a pair of small pliers that can bend a small tab. Also a cup or two for parts/screws.

Most tiny screws have Loctite on them. DO NOT STRIP THE HEADS. Make sure your screwdrivers are up to the task (sharp and small)

1) In the car, push the "open" button to open the LCD screen
2) disconnect the positive battery terminal under the hood so the screen does not fold back in accidentally.
3) with the screen laying flat now, remove the 2 screws on the side of the LCD that hold the panel to the arms. This will give you some movement of the panel that you'll need to get at the other items
4) carefully reach a magnetized screwdriver UNDER the panel and remove the two small screws holding the 3" by 1" plastic panel behind the LCD. This panel is used to secure a ribbon cable in place, but you need to remove the panel to give yourself enough slack for the next step. Don't worry, the ribbon cable won't come loose unless you yank on it.
5) now that you have a little slack you can get at the back of the LCD. You might find it easier to tilt the LCD to the side to get it out of it's tracks (I did this). There is a silver plate held on by two tiny screws. That plate helps hold the ribbon cable in place on the LCD. Once removed you can get at the cable connector. To detach the ribbon cable, flip up the connector with a small flat head screw driver. Once flipped up the cable will detach, and you can remove the entire LCD unit from the car

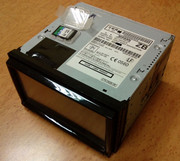
Now that you have the LCD on a work bench you can work on it.

6) remove the 5 screws surrounding the plastic bezel. There are three on top and 2 on the bottom
7) remove the 4 screws on the back of the unit holding the metal backing in place.
8) once the screws are removed, use a tiny flathead screw driver to work your way around to release the little tabs holding the metal back plate on. Remove the back plate, exposing the PCB
9) carefully disconnect the 4 ribbon cables on the back. The large one and the one next to it have flip up connectors. The other two have slide connectors. These slide out with a tiny screwdriver, but you don't have to remove them all the way to release the ribbon cable
10) Remove the PCB. My PCB was still held in place by two interesting connectors on the back, even though the screws were removed. These were basically a tiny tab sticking through a slot on the PCB, then bent sideways. You need a pair of small pliers to bend them straight (aligned with the slot) so you can remove them
11) Remove the LCD and touch screen from the black bezel. It just snaps in place, so you can just work it out.

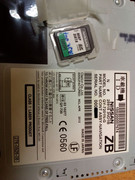
Now you are holding the LCD, complete with broken touch screen glass in front. The touch screen has glass (broken) and a plastic covering.

12) Carefully separate the LCD and touch screen (it just pulls apart), paying attention to the position of the touch screen glass and its connector. At this point you'll have broken glass, so be careful. Also, you'll want to avoid getting anything on the LCD glass. I had to clean mine off because it had a dusting of broken glass on it.

At this point you will put stuff back together in reverse order. The biggest thing to be careful about is to make sure all the ribbon cables are connected securely. I got mine all put back together and had just a white screen because I didn't have the large cable on the back of the PCB in far enough (the little tabs on the side of the ribbon go inside the connector, not outside)

13) Line the Touch screen glass back on the LCD, and re-insert back into the black bezel. Be careful to put the ribbon cables back through the slots they came out of. A third hand would have been good here, but you can manage
14) put the PCB back on, making sure to twist the mounting tabs back in place. Attach the ribbon cables.
15) Re-attach the metal back plate, and then reinstall the 4 mounting screws and the 5 screws surrounding the black bezel.

At this point, you have a repaired LCD/touch screen unit ready for re-installation in the car!

16) Reattach the ribbon cable from the car, and secure the rear plate that holds it in place. A hint...There's an alignment tab on the ribbon cable. Make sure it will reach the alignment dots on the back of the LCD. If not, the ribbon cable is not situated correctly.
17) Perform an amazing magic trick by re-attaching the plastic plate that sits behind the unit. Three hands, a magnetized screw driver, luck, and a live chicken sacrifice are required
18) get the LCD back into it's rear tracks by lowering one side and working it in
19) reattach the two screws in front holding the LCD to the opening arms
20) reattach the battery, pray to whatever god you trust, kiss a baby, take a deep breath, and turn the car on.

When you reattach the battery, the front panel will close

A little trouble shooting help:

If you get nothing from the screen...not even light...take it back apart far enough to check the connection of the large ribbon cable from the car to the back of the LCD.

If the screen lights up, and is responsive to the day/night button, but there's nothing displayed, the problem is the largest of the 4 ribbon cables on the back of the PCB. Ask me how I know. I didn't have it in far enough to make good contact and had to go back in.

If everything looks good but the touch screen doesn't work, then 95% sure the thin ribbon cable for the touch screen wasn't secured correctly

Hope this helps!
 
Thank you for your write up! This is what makes this site great.

BTW: I can still read your name and address on the picture.
 
Thanks for the heads up. Here's the modified image

CcAXWllUYAEHlkr.jpg
 
Hi,

First, sorry for my english and a little spam ;)

I would sell Clarion qy-7201n-g control unit from april 2012. This is new item, never used, in perfect visual condition, but I sell it for spare parts. I haven't got Nissan Leaf. I bought this unit for my Ford Focus, but I can't launch it without nissan console (there isn't power button on the unit).
I bought interface from Nissan to standard iso connectors and connected to power and only CD (DVD?) drive and tilt function worked. The screen is totally off. I think there is CAN connection, or maybe power button needed, but I gave up.
Location of this device is Poland, Europe. I'm not need it, but maybe You need unbroken screen, or some other components. There is a high probability, that Clarion is not only in visual good condition, but in technical too, but, as i described, i can't check.

I bought it for 350euro which was good price for clarion sound, big screen and EU navigation.

Because (1) I do not want to make money, (2) it is totally useless to me, (3) it takes place on the shelf, the price is only 250 euro or $ + shipping.

If you are interested send me a PM

Regards, Artur.


This thread was extremely helpful in fixing my screen. Start to finish, it took about 30 minutes. Very helpful!!!
 
Also need a touchscreen on the Clarion QY-7200N-B. Where can I buy it?
Or this one will do: Clarion QY-7201N (25915-3ND0A)? Will it work normally?
 
I presume you have a 2011? I ran into the same problem.

See also this thread: http://www.mynissanleaf.com/viewtopic.php?f=30&t=10828&start=20

Found a seller on ebay that had one - but looks like they are out. But you might try contacting them.

As for will the 7201 work - don't know. But please let us know if you try that (I seem to break mine about once a year...)
 
sdmike1 those are fantastic instructions, thank you!

The same happened in my 2015 Tekna so I began searching serial numbers for spare parts. Clarion were less than helpful, told me they are not allowed to sell spare parts directly and instead I had to go straight to Nissan - but he warned me it would cost over £2k because the unit is discontinued and they simply do a swap out with a reconditioned unit rather than attempt any sort of repair.

So I bought one of these from Aliexpress for £12 including UK postage and set about following sdmike1’s instructions. It took about an hour and worked first time.

https://www.aliexpress.com/item/1005002542833696.html
ZhiYuSun for NISSAN QY-7221 Car dvd general Screen Touch Screen Digitizer QY7221

Brilliant, thanks.

Chris
 
chrismurray said:
So I bought one of these from Aliexpress for £12 including UK postage and set about following sdmike1’s instructions. It took about an hour and worked first time.

https://www.aliexpress.com/item/1005002542833696.html
ZhiYuSun for NISSAN QY-7221 Car dvd general Screen Touch Screen Digitizer QY7221

Just wanted to say thank you for the Aliexpress link! Cheers.
 
I've just done exactly the same. Bought the touch panel from AliExpress

https://www.aliexpress.com/item/1005002542833696.html

It took about 40 mins to replace and it works perfectly. I took the audio fuse out which is under the front bonnet next to the battery, rather than disconnecting the battery. Also once fitted I need to go into the diagnostic menu to recalibrate the touch panel. Great instructions from sdmike1.
 
Back
Top