


HI,
so just like my DIY locking glove box mod - i wanted a locking center console as well. my other vehicles have locking center consoles and its not really for theft....if a thief gets in, they destroy break and find a way to get in, im more doing this for keeping young kids from opening the center console..............u know...dog is in there....
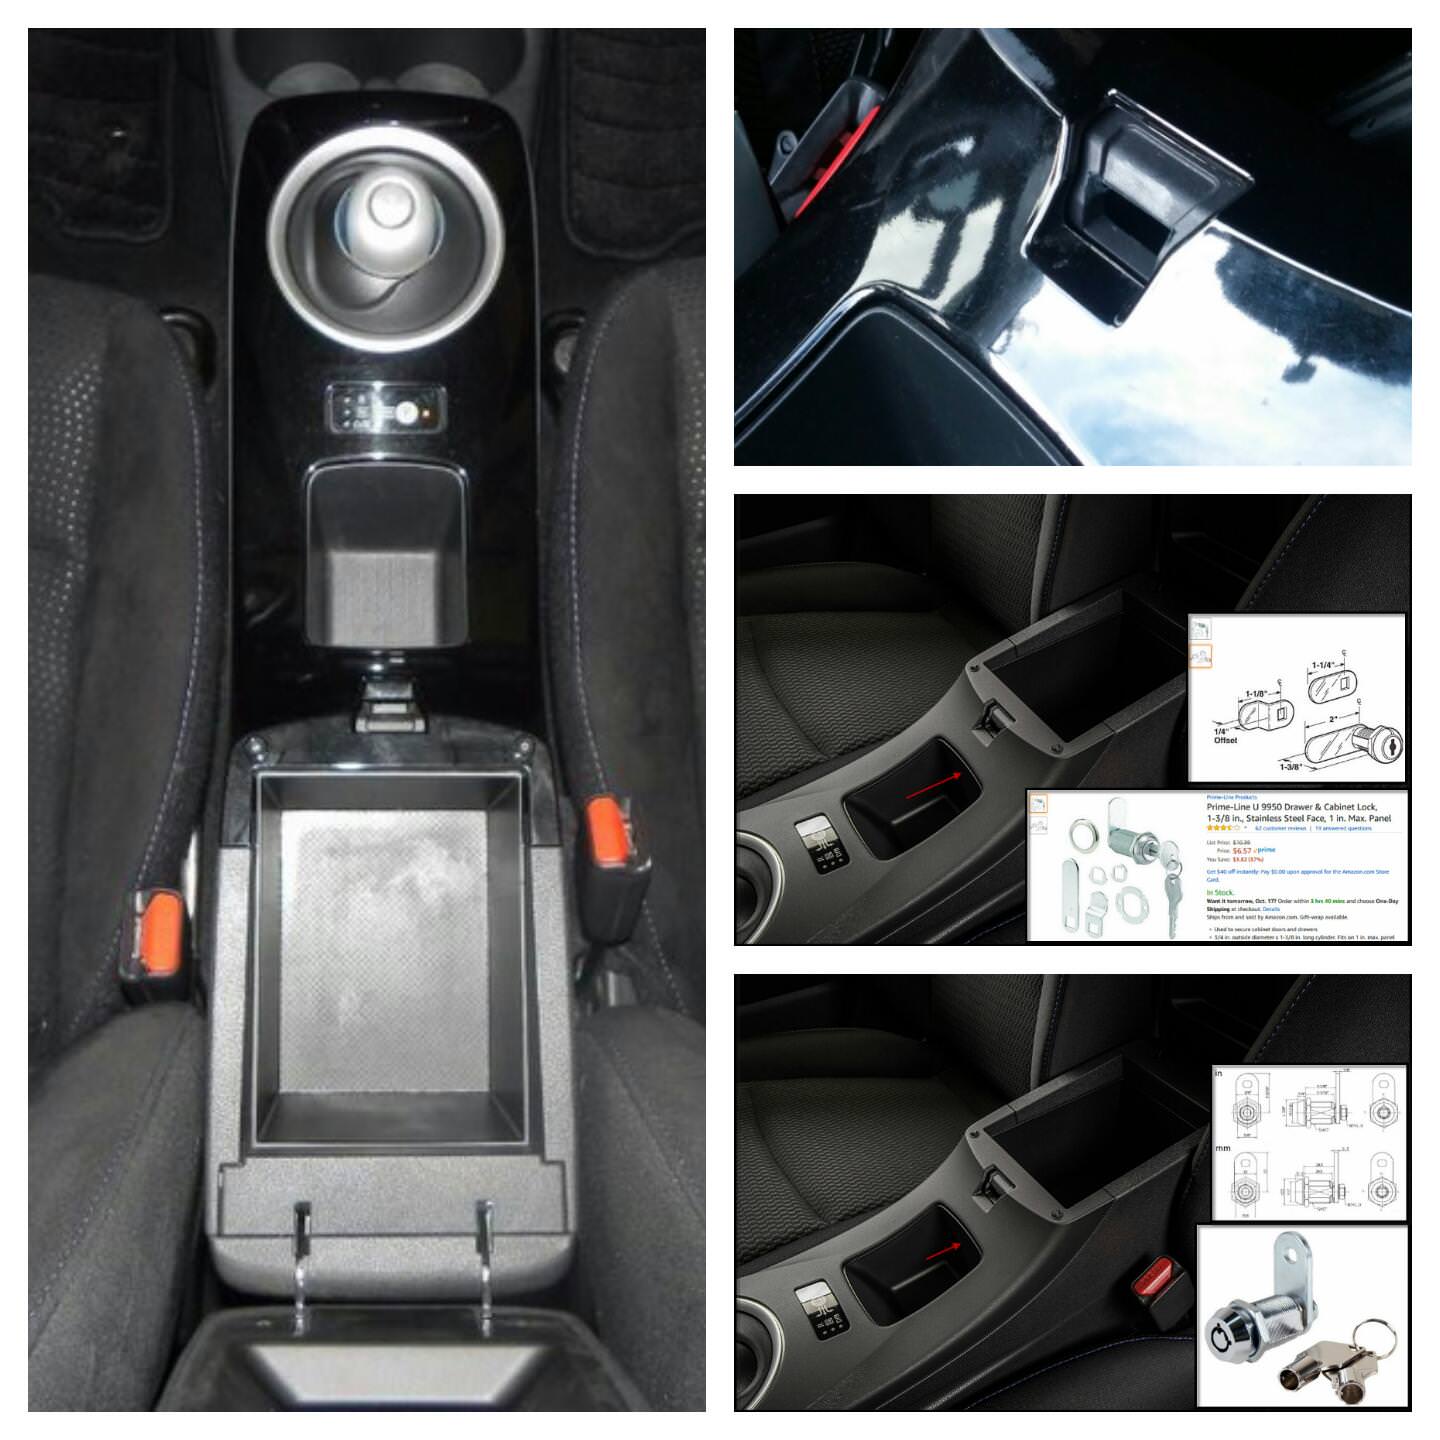
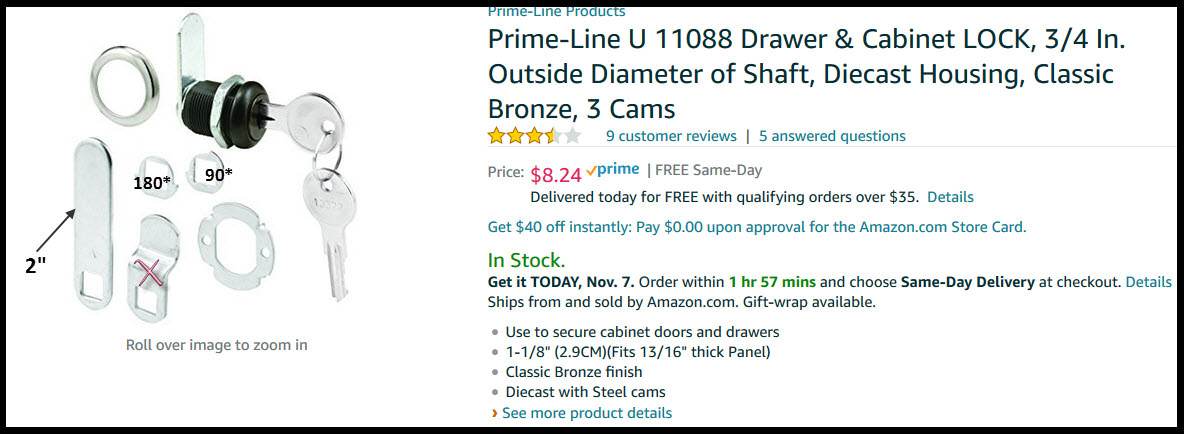
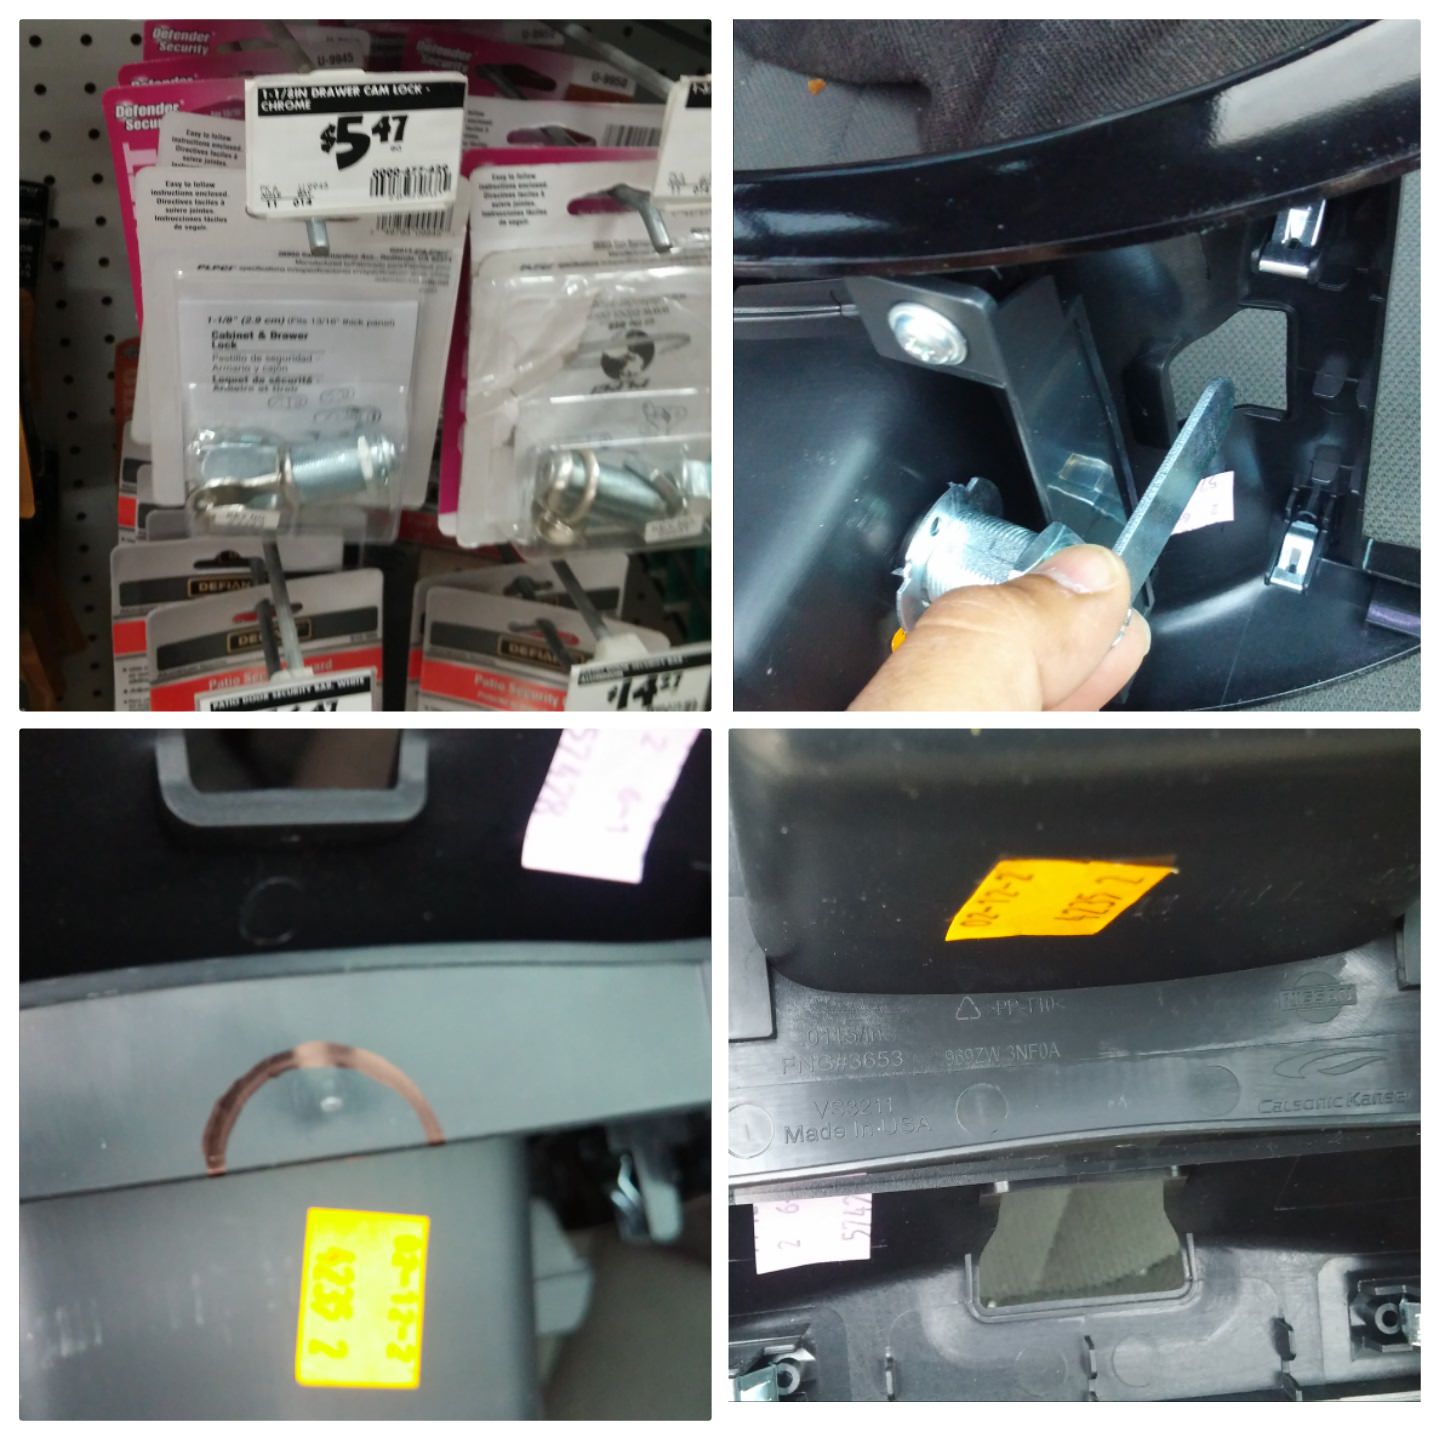
So, my first thought was to use a CAM lock and the PRIME LINE model in the middle pic is what i used because it has a 2 inch long cam that comes with it. From my measurements it needed to be at least a 2 inch cam. The Prime line model was the only one i found with a 2 inch cam. but there are many many different cams out there by other brands using other types of keys. like the bottom right picture shows a circular key.
CAM lock:
Brand: Prime line
1-1/8 inch length tumbler
3/4 inch hole needs to be drilled
2 inch cam flat is needed.
Location:
Black Prime line is available - i didn't think to look till after the mod, so i may change mine later:
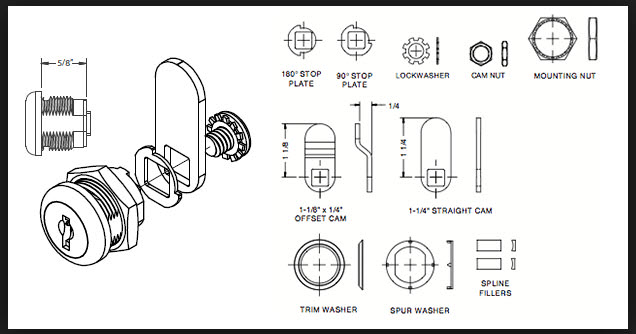
This pic is good for knowing the parts of a cam lock for reference:
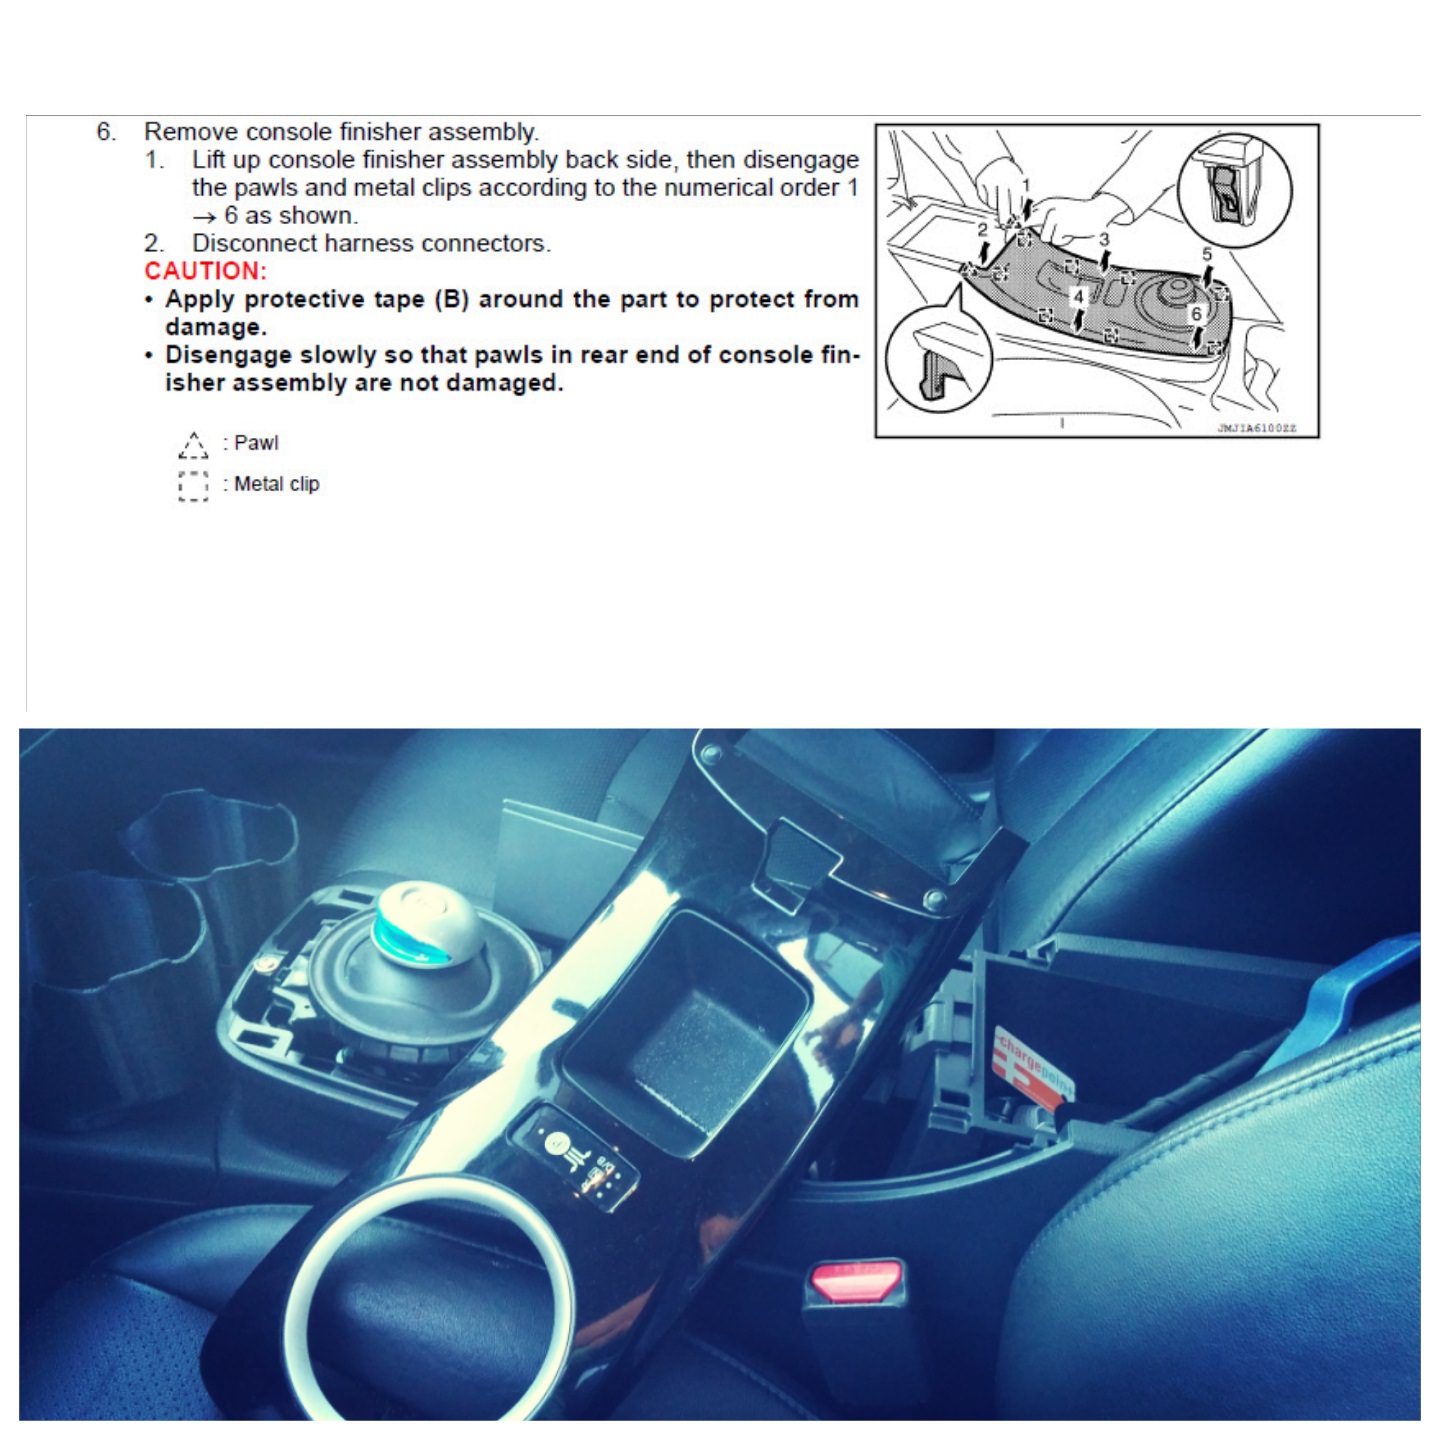
REMOVE the center console - using the FSM it says to pull from the rear side and it works. just feels weird pulling so hard, but it comes off easy:
After you remove it there is one wire harness that's the Park/Drive/Neutral indicator. its a typical clip and can be removed easily with small screw driver pressing the tab. If you need to take your time on this mod and still use the car you can simply unscrew the P/D/N display and re harness it and simply lay it in there to keep the center console finisher separate to work on it on your leisure.
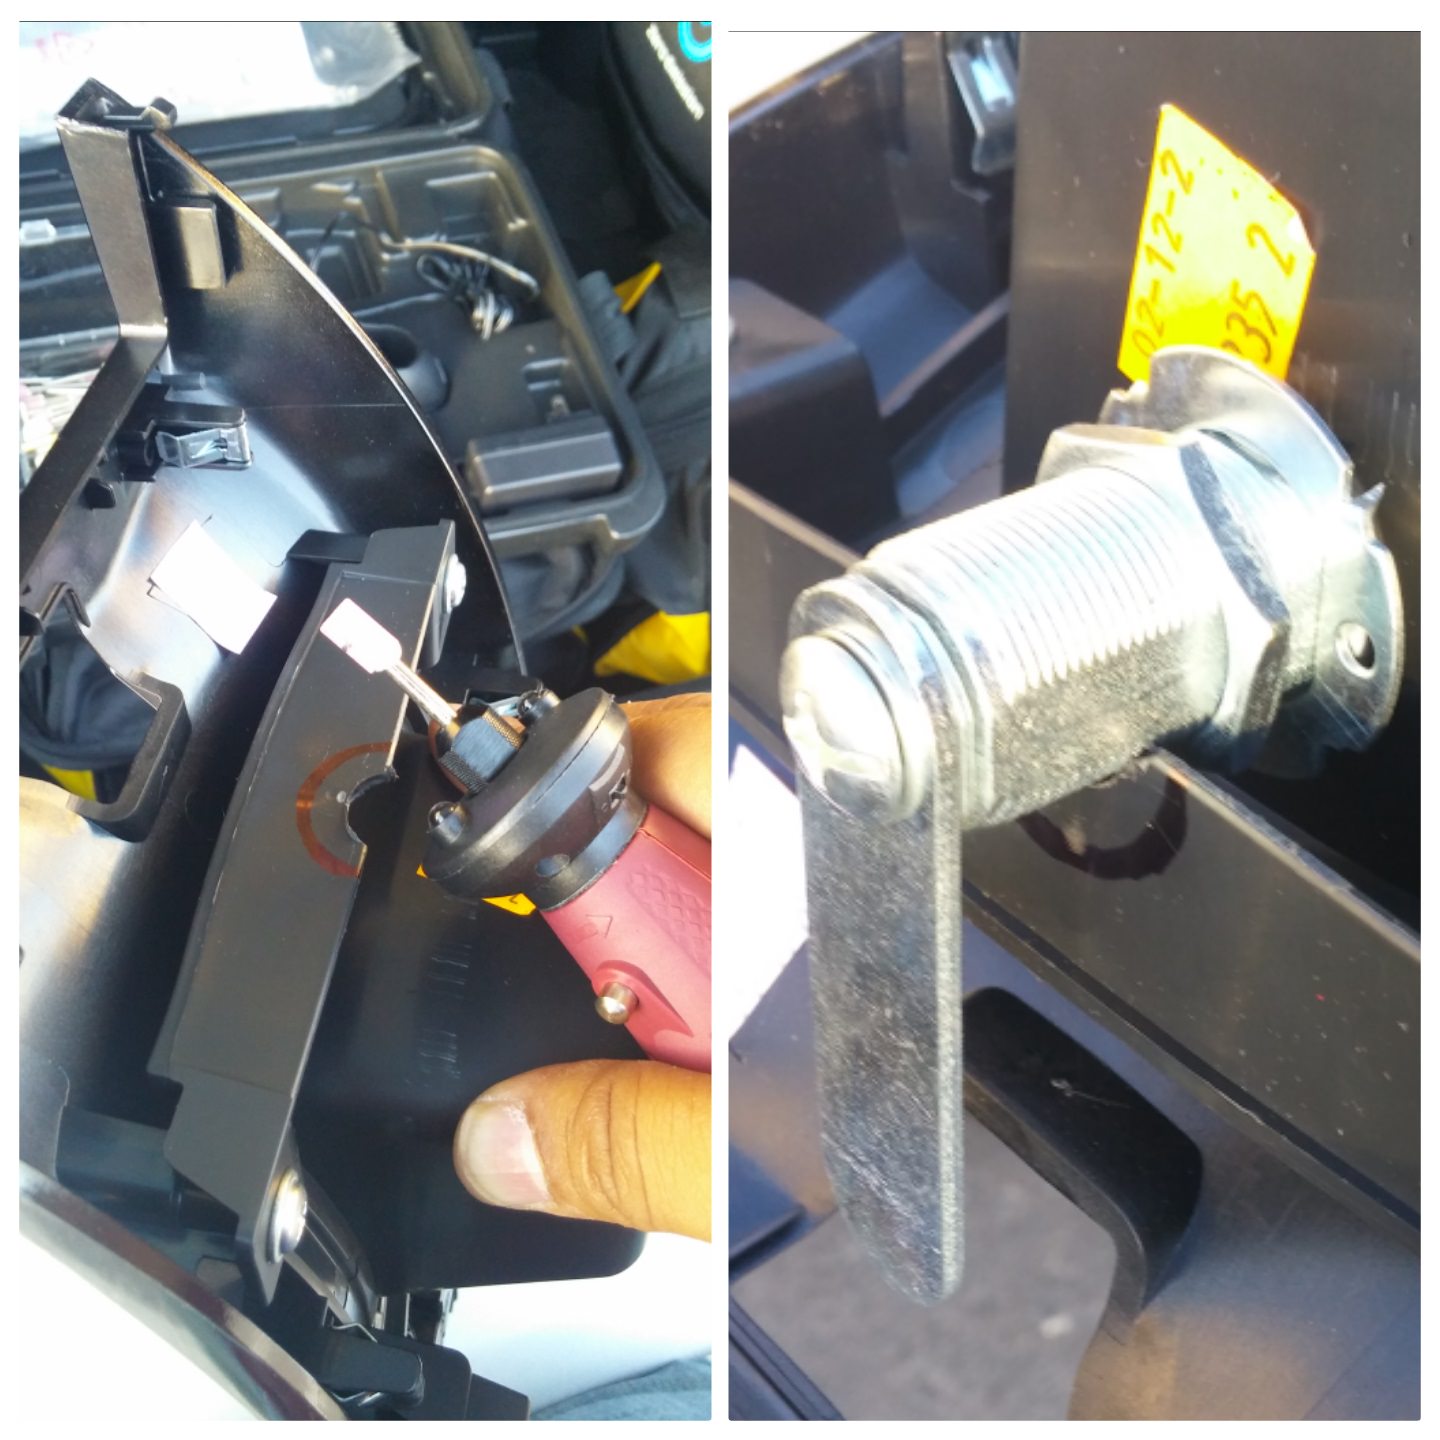
So Home depot also had this same CAM lock branded as another manufacture (top left pic). these pics show in exaggeration where to half circle dremel out the plastic to help the cam fit/rest on that ledge of plastic.
Start dremel routing:
I measured that we need to dremel only .25 inch at deepest point and copy the curvature of the cam lock 3/4 inch threaded shaft. i actually cut .3 inch and its too much, so for anyone else doing this, cut less...i think .25 inch would be perfect.
Now we need to measure exact center to drill the mounting hole:
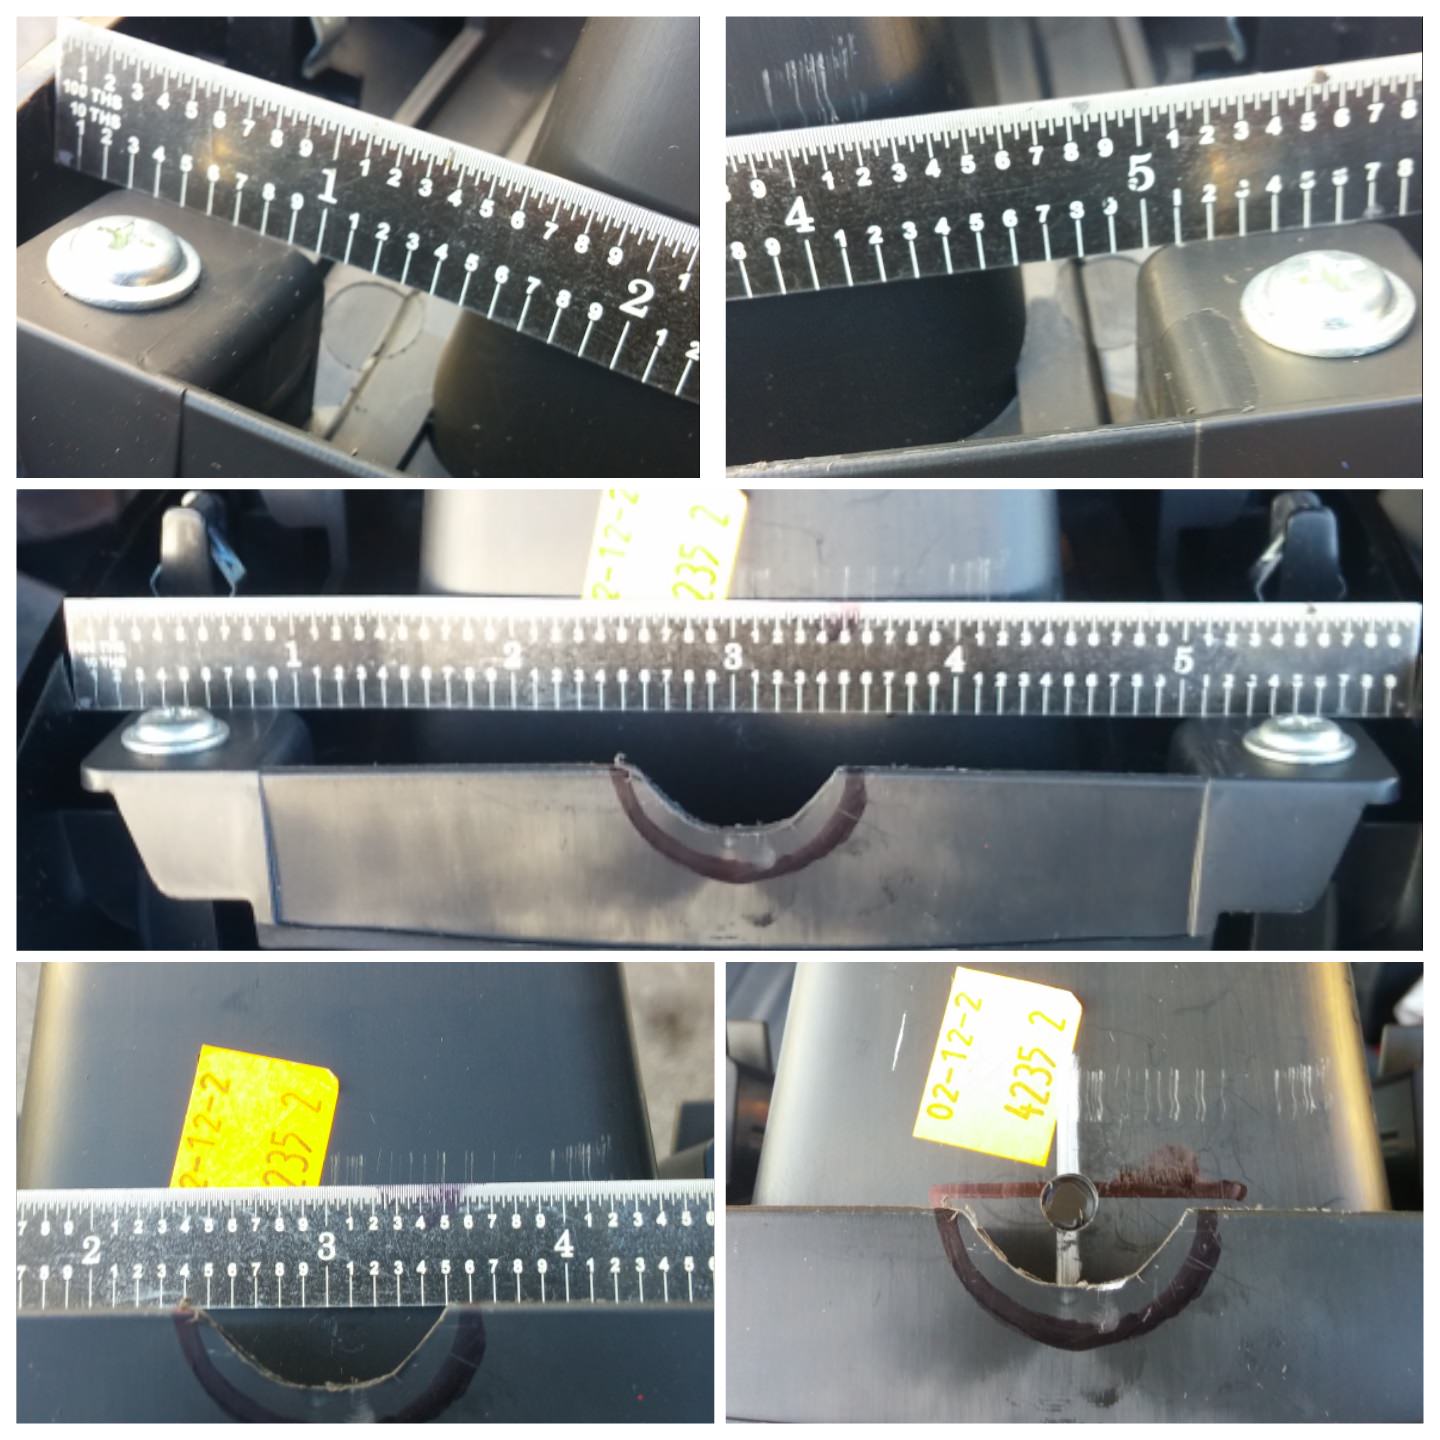
now from that pic you can see the 6 inch engineering scale IRONICALLY fit perfect from edge to edge and rested perfectly on the tabs by the screws so finding center was insane easy! it was meant to be!!! so ignore my attempts with the marker lines because in the end the scale sat perfect and the 3 inch marker was dead center and exactly where i needed to drill!!!!
HF step drill bit used:
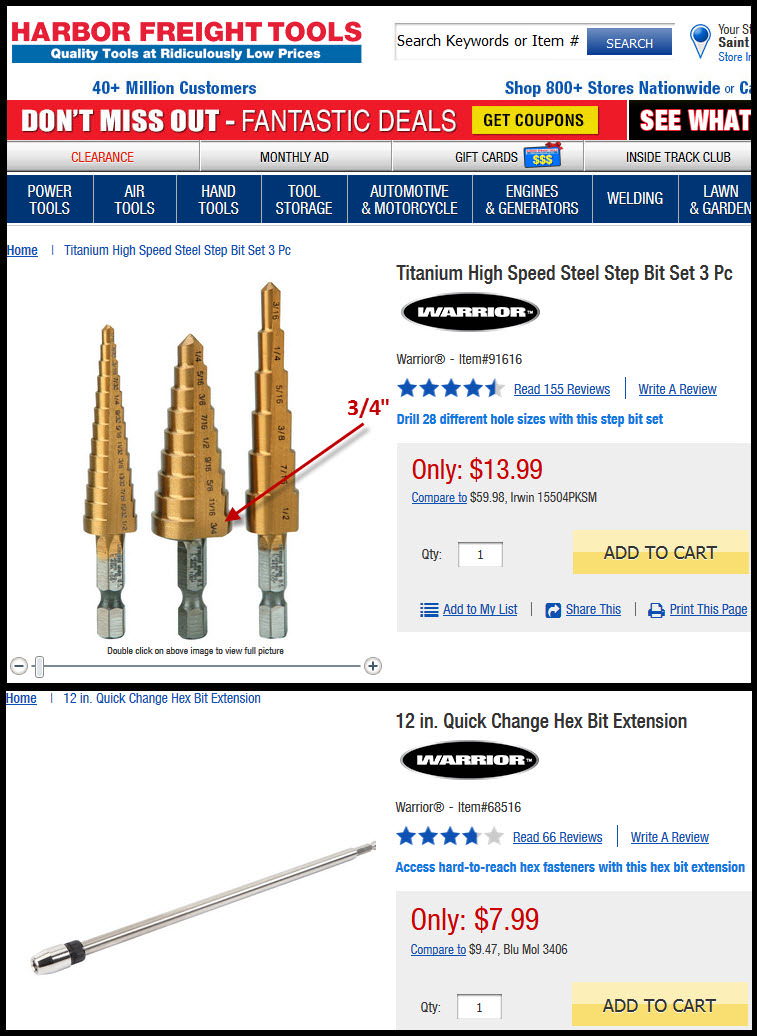
Step drill bit and extension needed to drill straight - take your time:
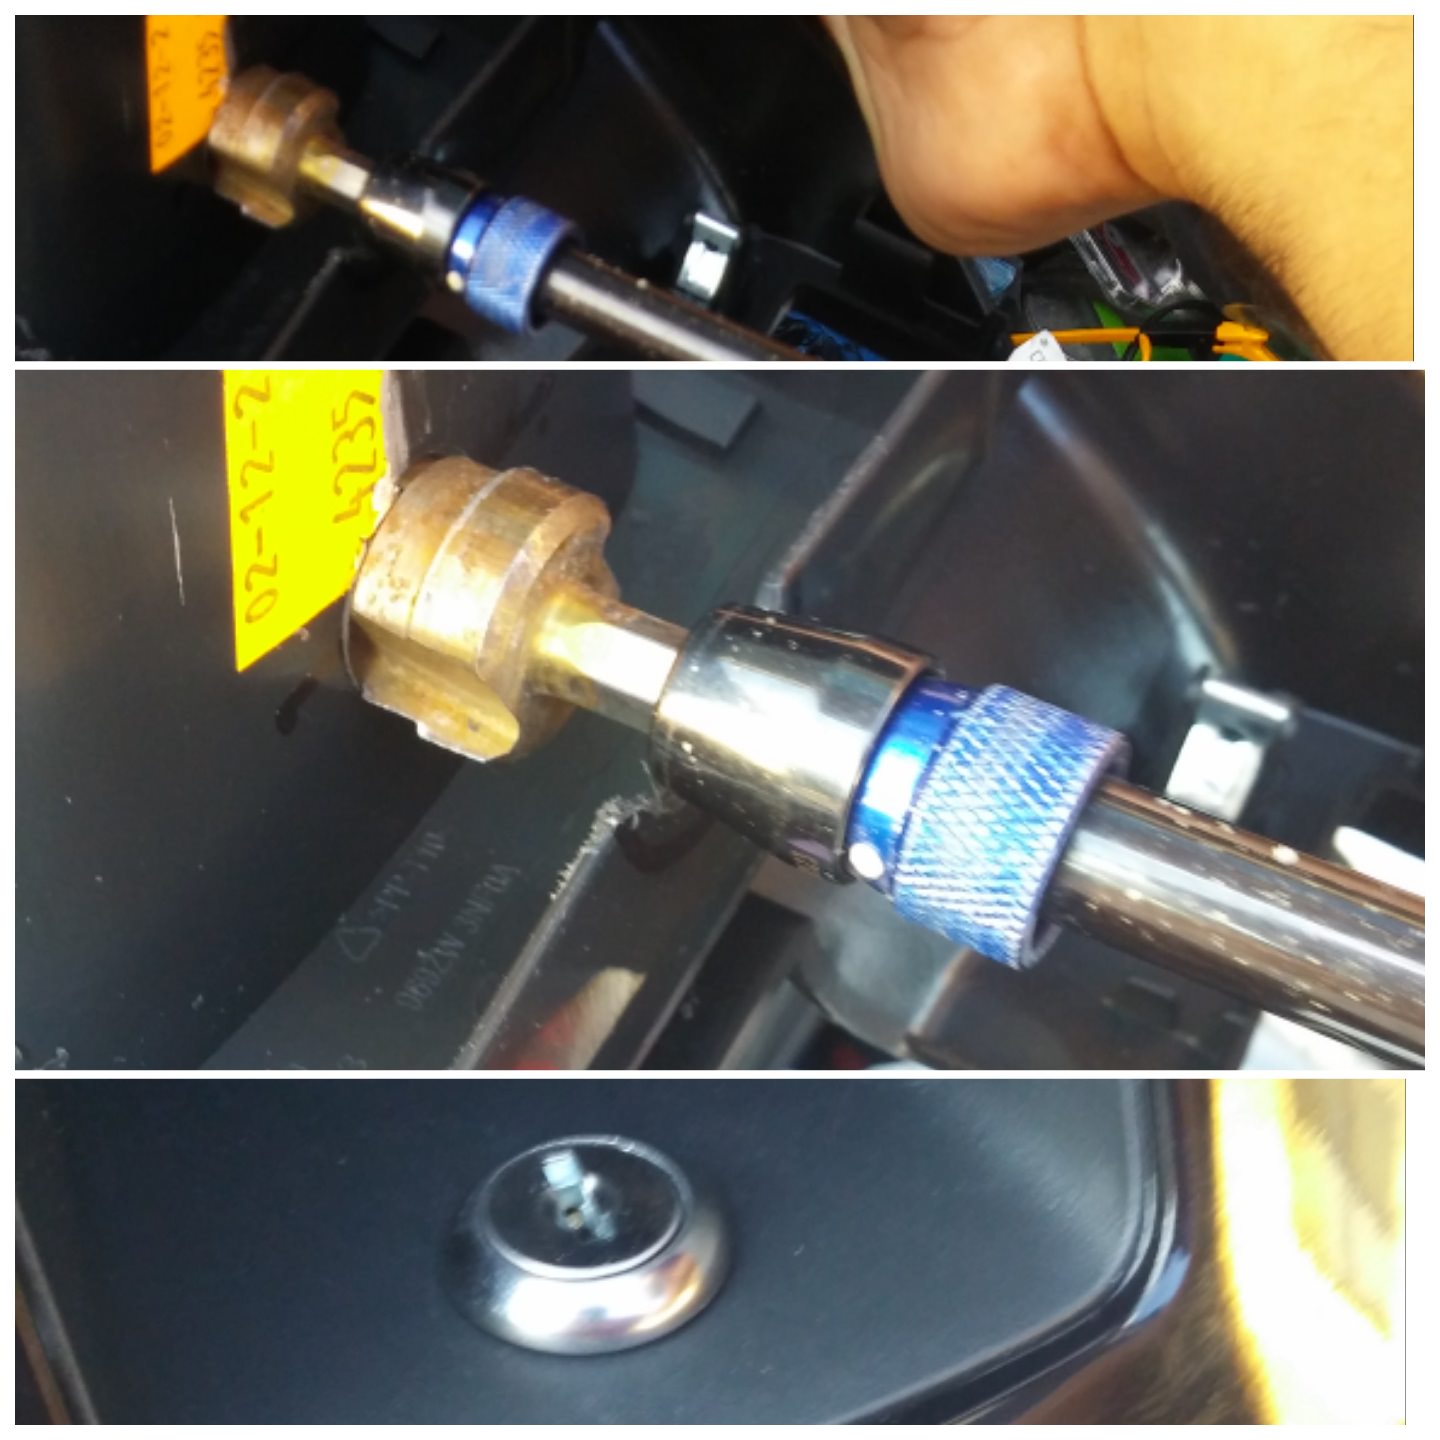
take your time, drilling fast will create ugly plastic edges. from other side, push cam lock in and check fitment (bottom pic of the 3).
NOw its time to temp install the CAM 2 inch plate onto the lock and swing it back and forth - look close and you can see the cam swing line curve marked the plastic. I had it set on 180 degree STOP plate, but later changed it to 90 degree stop plate. the marks it made and resistance you feel lets you see where exactly you got to trim a little of the BACK side of the center console finisher. this is all to make a smooth cam swing when turning the key.
Notch:
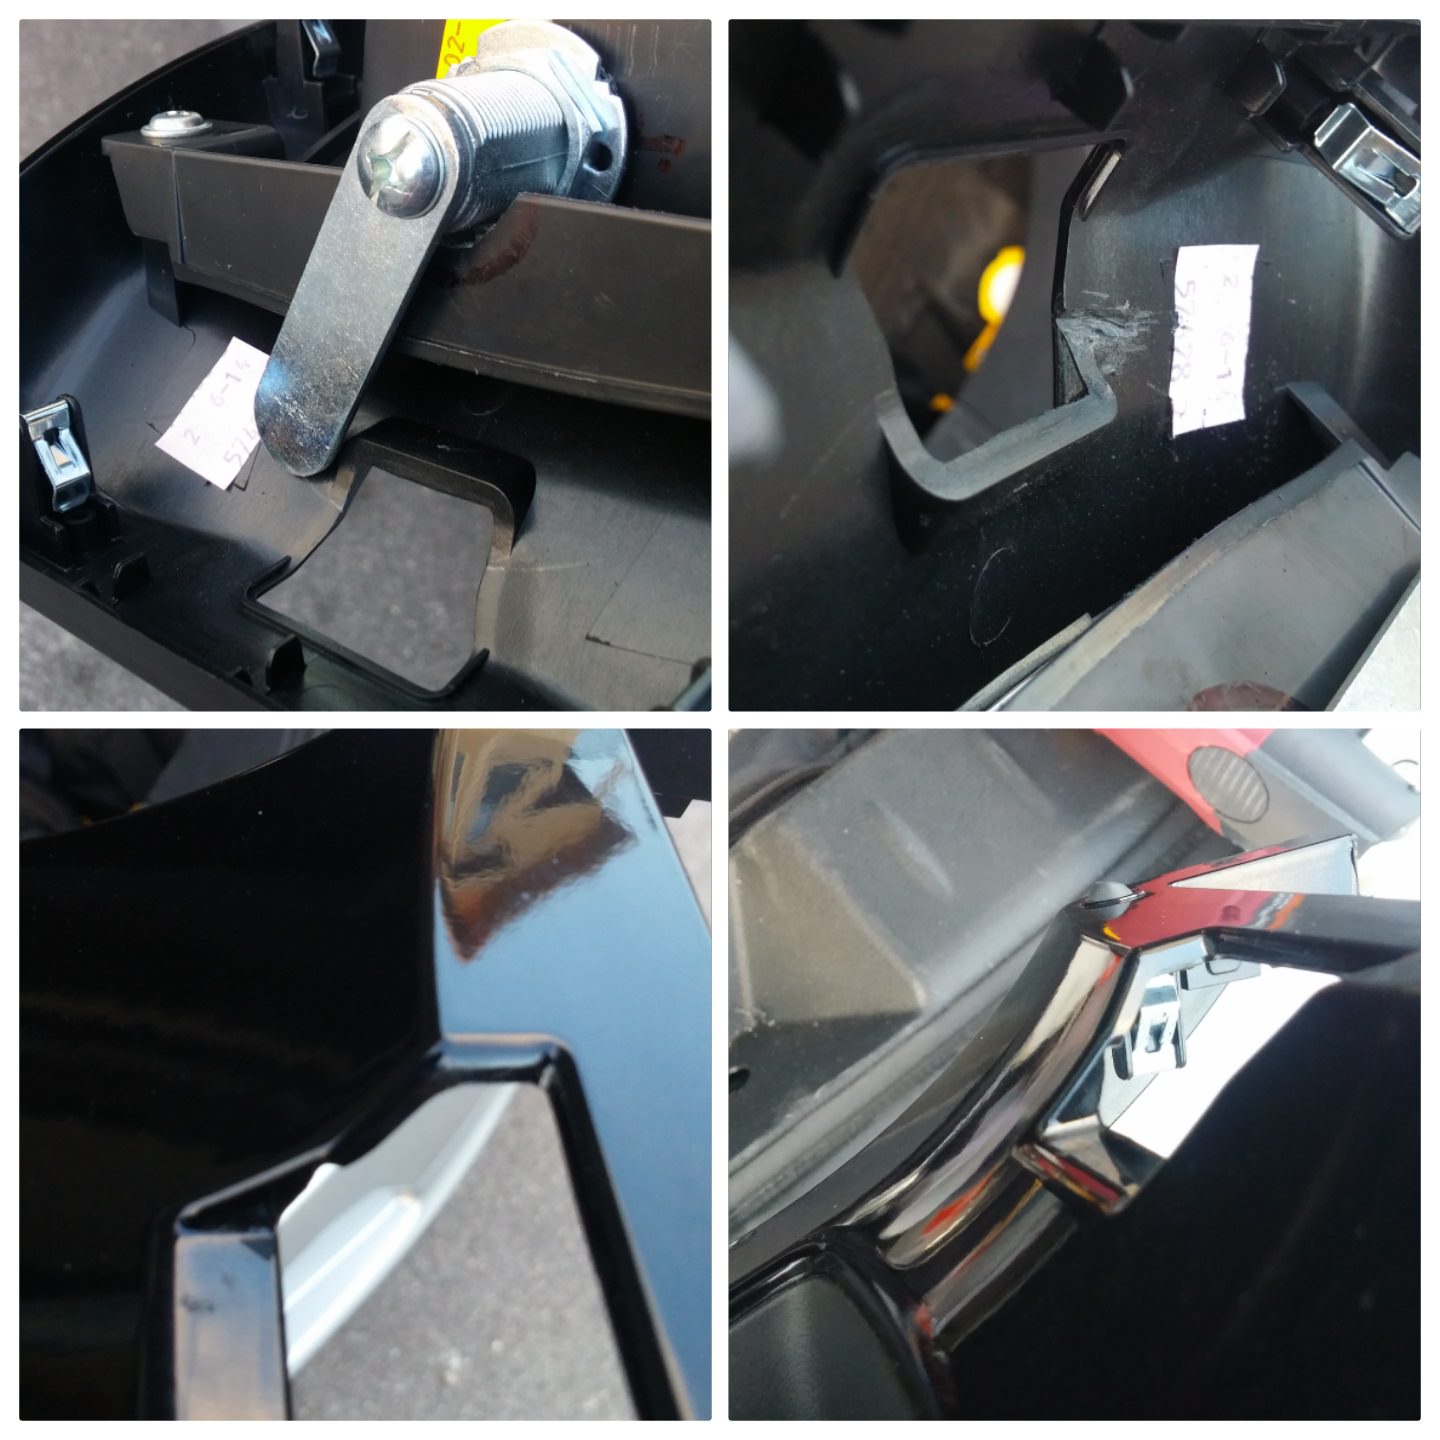
TRIM the lid latch area to allow for the cam to swing into place:
I used a dremel to make nice cuts to remove the section needed so the cam can swing into position to block the lid latch
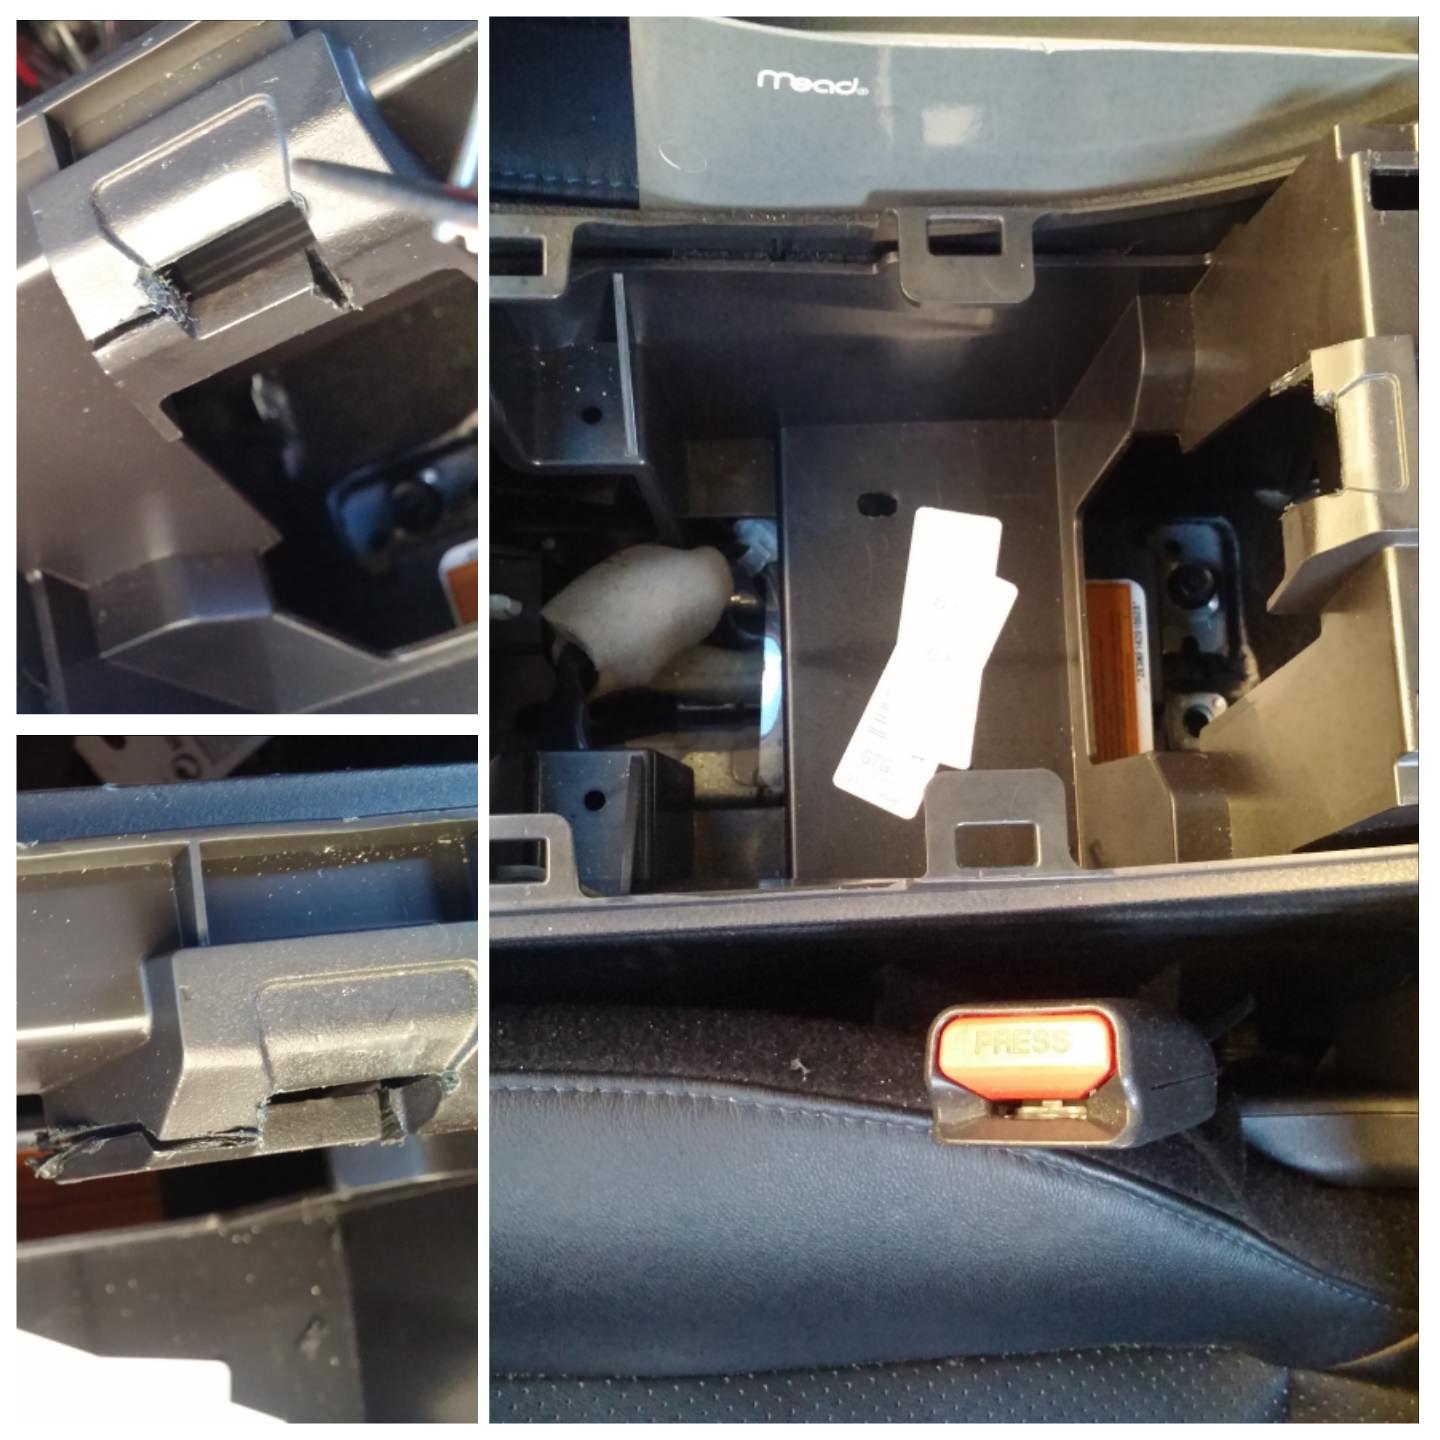
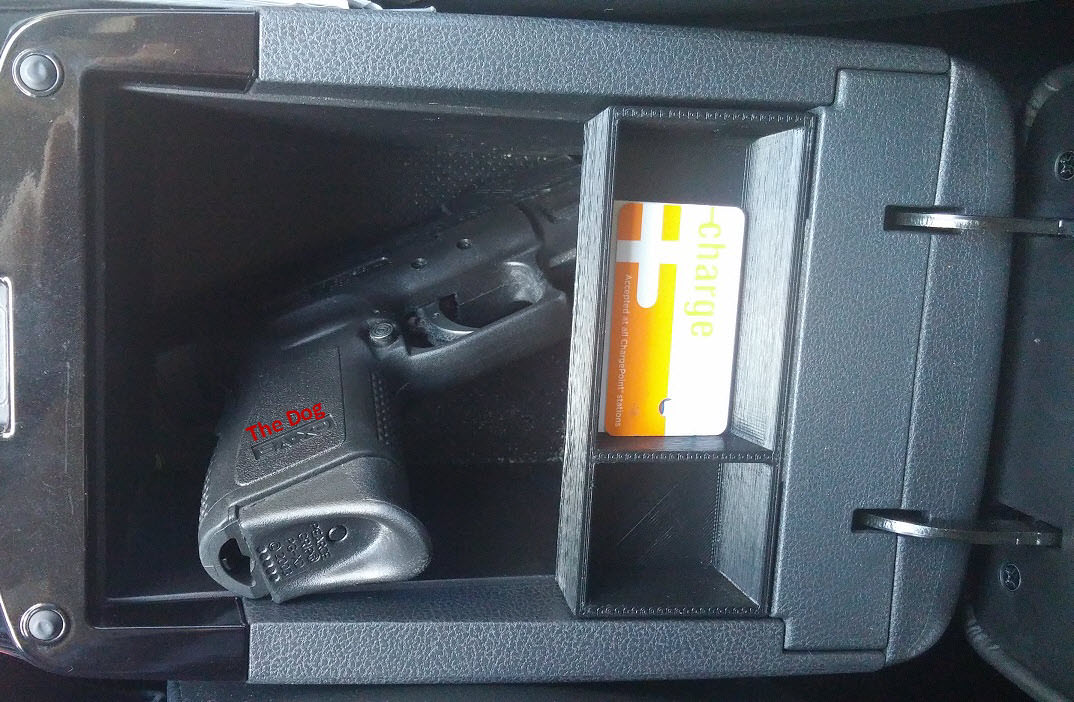
Finished product:
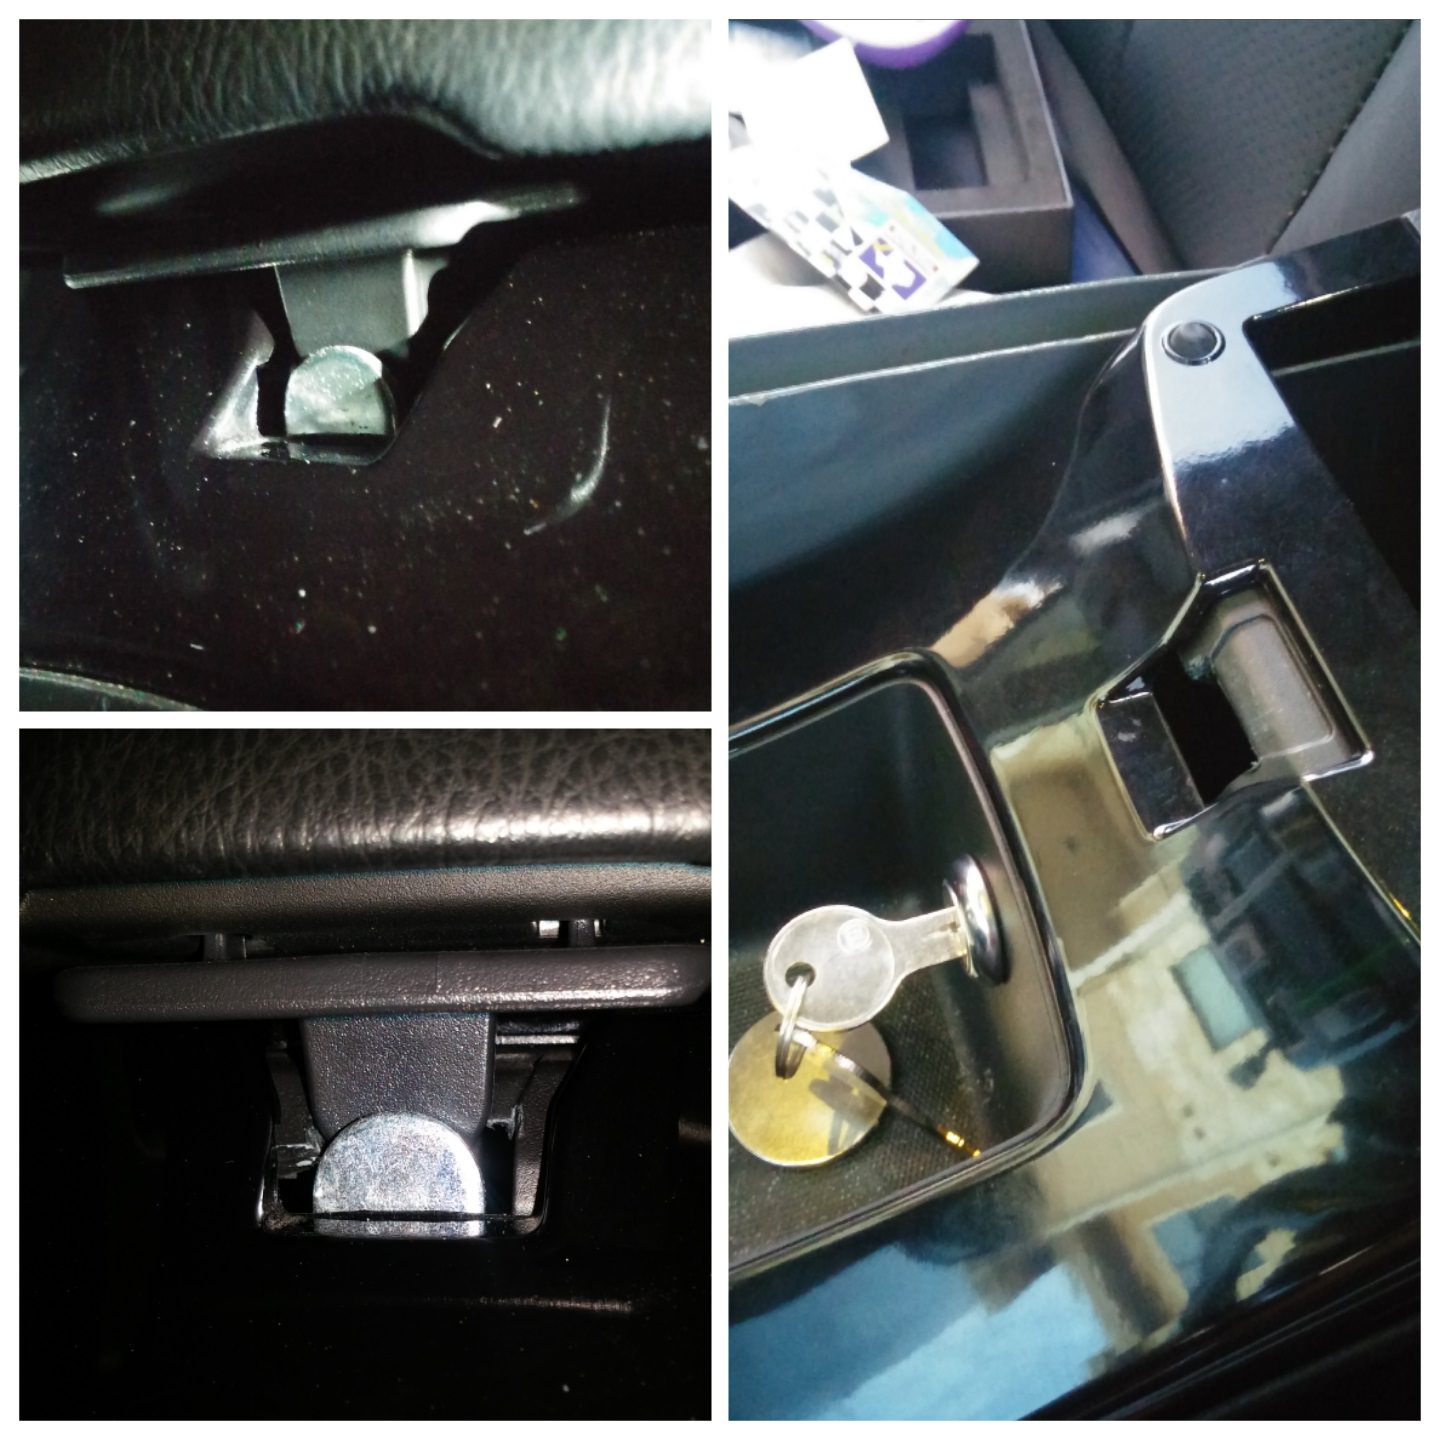
oh, and the dog house has a lock for the dog:
Videos:
Video1:
https://youtu.be/zoqMzWqWT6Q
Video2:
https://youtu.be/yZj4tbqGYOY
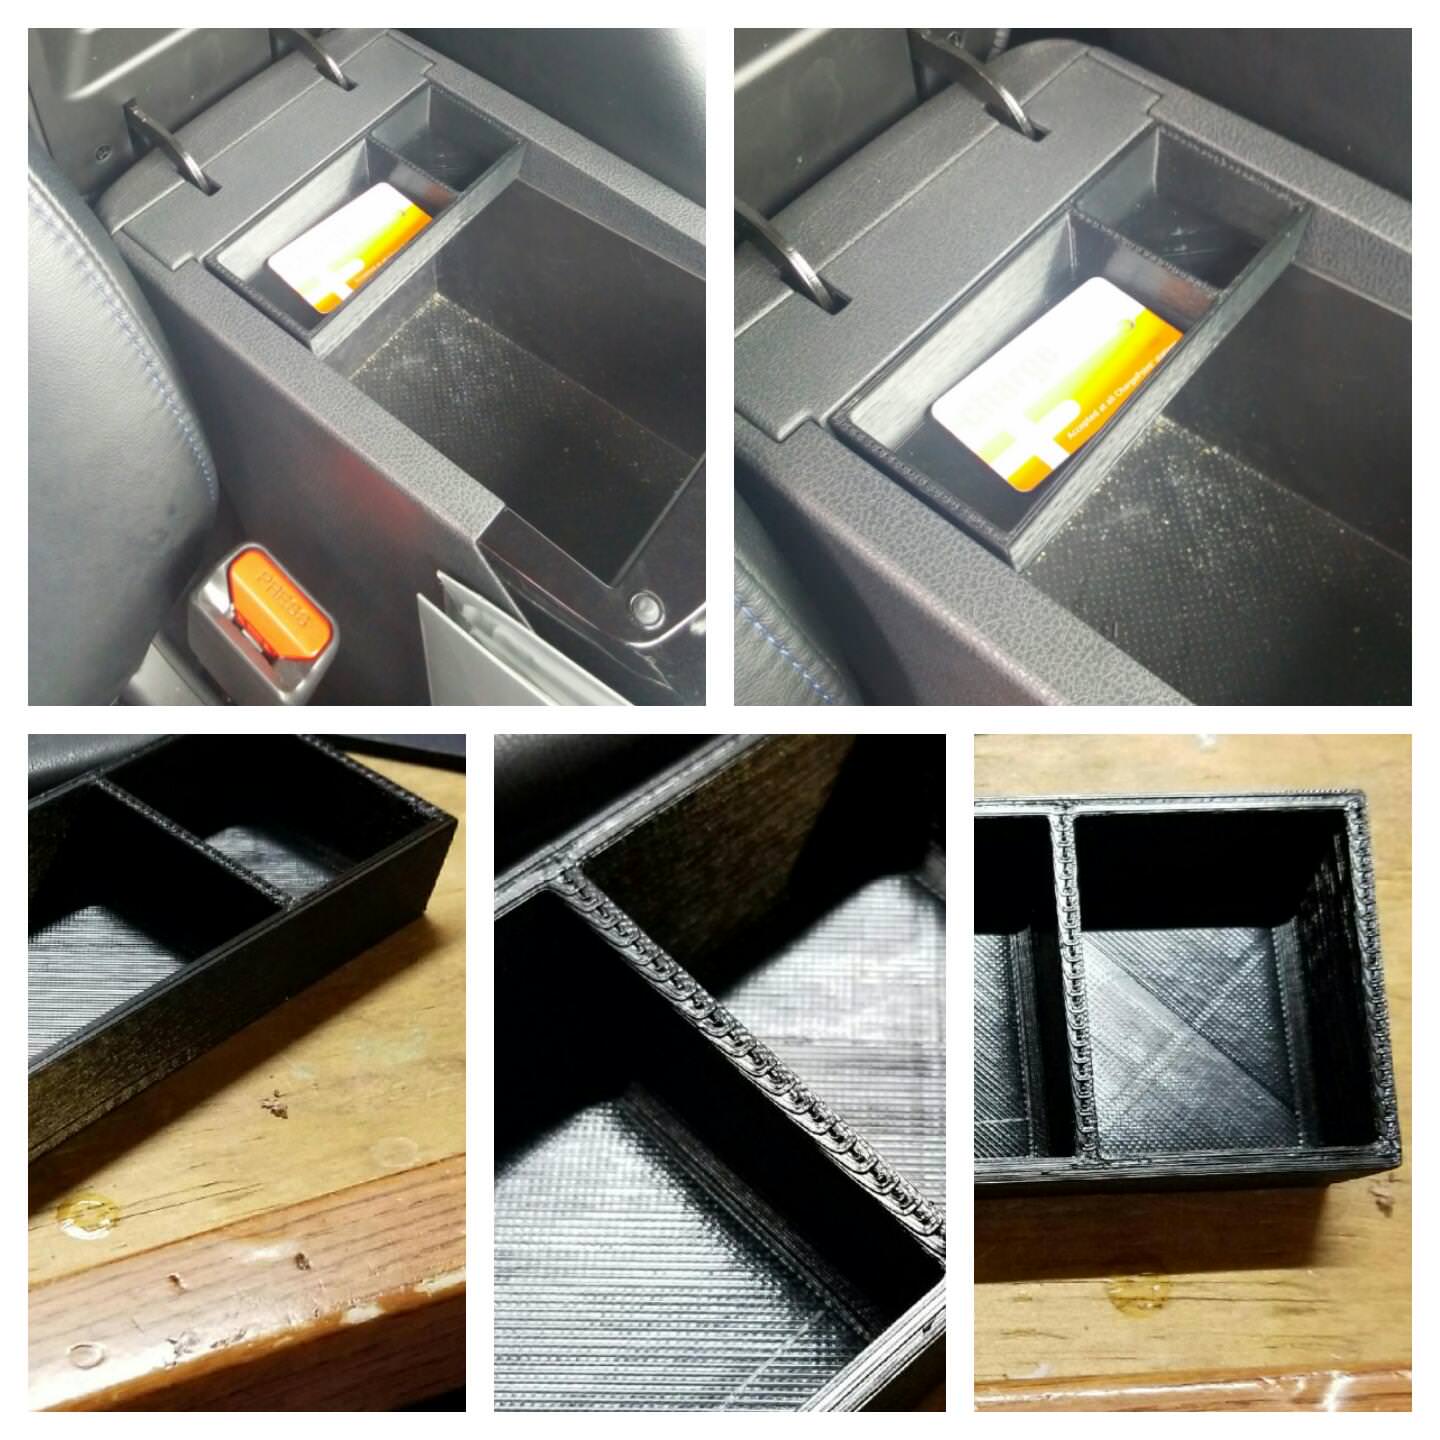
The tray in the center console is a 3d printed tray from thingiverse site:
https://www.thingiverse.com/thing:2249388
Further - while i had the entire console apart i decided to get a magnet and double side tape adheasive disc mount a magnet under the pocket tray. anything metal i put in there wont slide and rattle around - so i did this at the same time as this mod. I used a few dabs of E6000 epoxy as well:
Magnet:
the magnet at the bottom of the pocket is temp and i remove after 24 hours when im sure the epoxy is cured.
I did the entire install in about an hour taking my time.
-J
so just like my DIY locking glove box mod - i wanted a locking center console as well. my other vehicles have locking center consoles and its not really for theft....if a thief gets in, they destroy break and find a way to get in, im more doing this for keeping young kids from opening the center console..............u know...dog is in there....
So, my first thought was to use a CAM lock and the PRIME LINE model in the middle pic is what i used because it has a 2 inch long cam that comes with it. From my measurements it needed to be at least a 2 inch cam. The Prime line model was the only one i found with a 2 inch cam. but there are many many different cams out there by other brands using other types of keys. like the bottom right picture shows a circular key.
CAM lock:
Brand: Prime line
1-1/8 inch length tumbler
3/4 inch hole needs to be drilled
2 inch cam flat is needed.
Location:
Black Prime line is available - i didn't think to look till after the mod, so i may change mine later:
This pic is good for knowing the parts of a cam lock for reference:
REMOVE the center console - using the FSM it says to pull from the rear side and it works. just feels weird pulling so hard, but it comes off easy:
After you remove it there is one wire harness that's the Park/Drive/Neutral indicator. its a typical clip and can be removed easily with small screw driver pressing the tab. If you need to take your time on this mod and still use the car you can simply unscrew the P/D/N display and re harness it and simply lay it in there to keep the center console finisher separate to work on it on your leisure.
So Home depot also had this same CAM lock branded as another manufacture (top left pic). these pics show in exaggeration where to half circle dremel out the plastic to help the cam fit/rest on that ledge of plastic.
Start dremel routing:
I measured that we need to dremel only .25 inch at deepest point and copy the curvature of the cam lock 3/4 inch threaded shaft. i actually cut .3 inch and its too much, so for anyone else doing this, cut less...i think .25 inch would be perfect.
Now we need to measure exact center to drill the mounting hole:
now from that pic you can see the 6 inch engineering scale IRONICALLY fit perfect from edge to edge and rested perfectly on the tabs by the screws so finding center was insane easy! it was meant to be!!! so ignore my attempts with the marker lines because in the end the scale sat perfect and the 3 inch marker was dead center and exactly where i needed to drill!!!!
HF step drill bit used:
Step drill bit and extension needed to drill straight - take your time:
take your time, drilling fast will create ugly plastic edges. from other side, push cam lock in and check fitment (bottom pic of the 3).
NOw its time to temp install the CAM 2 inch plate onto the lock and swing it back and forth - look close and you can see the cam swing line curve marked the plastic. I had it set on 180 degree STOP plate, but later changed it to 90 degree stop plate. the marks it made and resistance you feel lets you see where exactly you got to trim a little of the BACK side of the center console finisher. this is all to make a smooth cam swing when turning the key.
Notch:
TRIM the lid latch area to allow for the cam to swing into place:
I used a dremel to make nice cuts to remove the section needed so the cam can swing into position to block the lid latch
Finished product:
oh, and the dog house has a lock for the dog:
Videos:
Video1:
https://youtu.be/zoqMzWqWT6Q
Video2:
https://youtu.be/yZj4tbqGYOY
The tray in the center console is a 3d printed tray from thingiverse site:
https://www.thingiverse.com/thing:2249388
Further - while i had the entire console apart i decided to get a magnet and double side tape adheasive disc mount a magnet under the pocket tray. anything metal i put in there wont slide and rattle around - so i did this at the same time as this mod. I used a few dabs of E6000 epoxy as well:
Magnet:
the magnet at the bottom of the pocket is temp and i remove after 24 hours when im sure the epoxy is cured.
I did the entire install in about an hour taking my time.
-J