Clipper Creek EVSE J1772 conversion from BMW Mini project

My Nissan Leaf Forum

Help Support My Nissan Leaf Forum:

This site may earn a commission from merchant affiliate links, including eBay, Amazon, and others.

TonyWilliams

Well-known member
Joined
Feb 19, 2011
Messages
10,107
Location
Vista, California USA
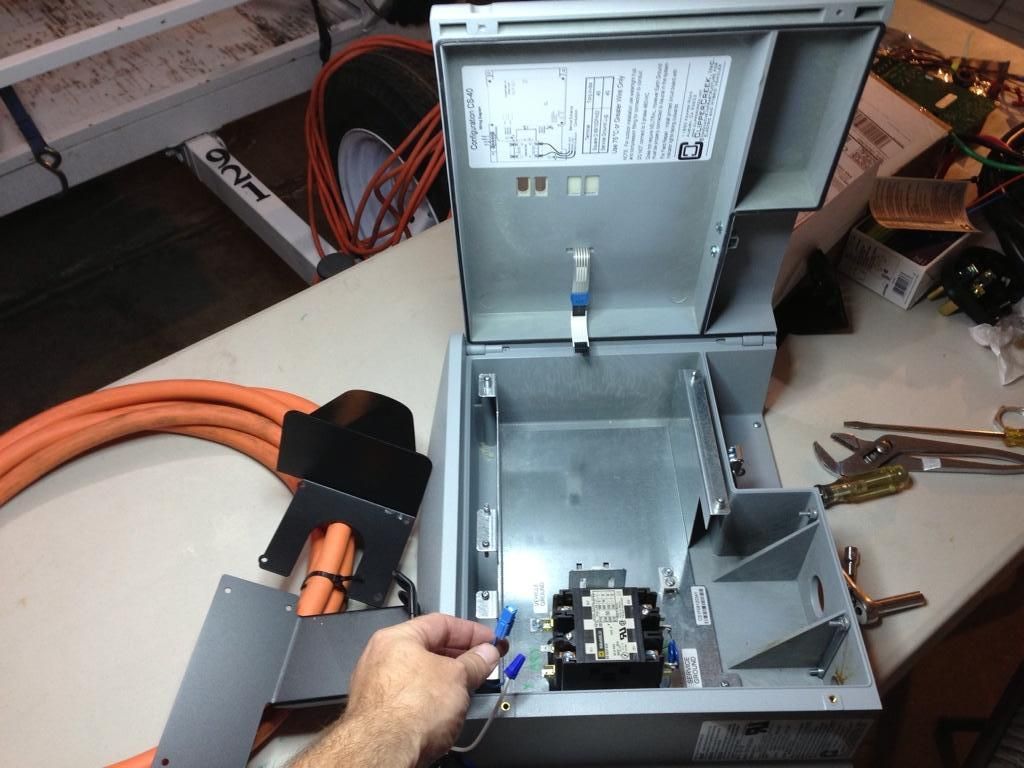
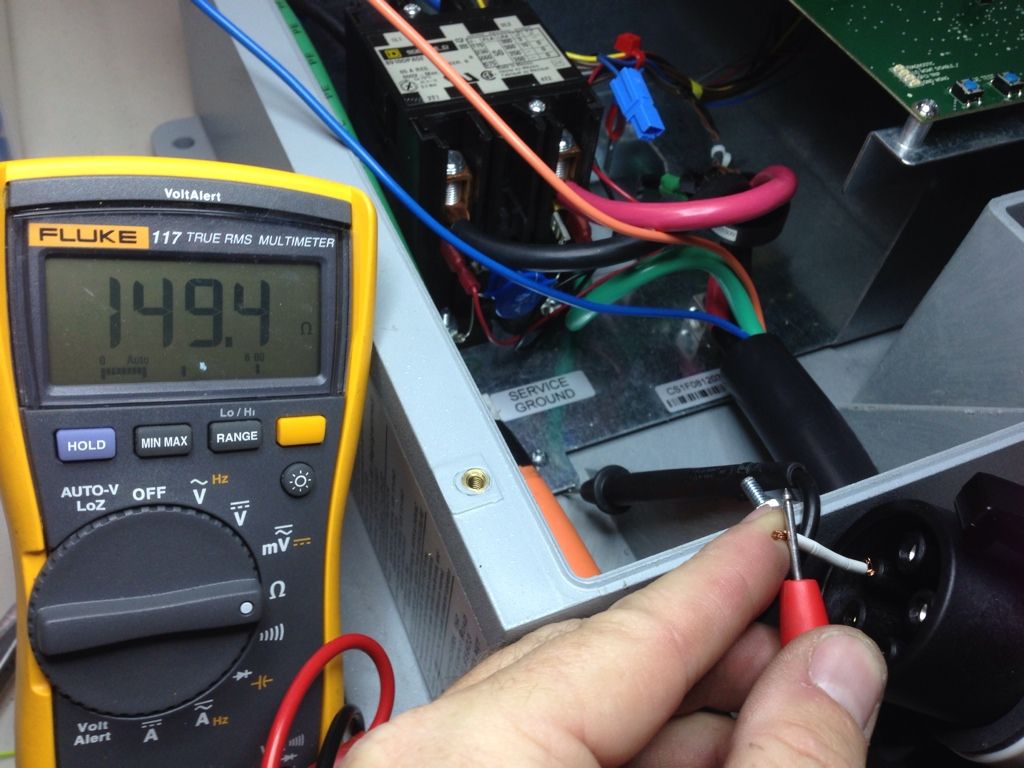
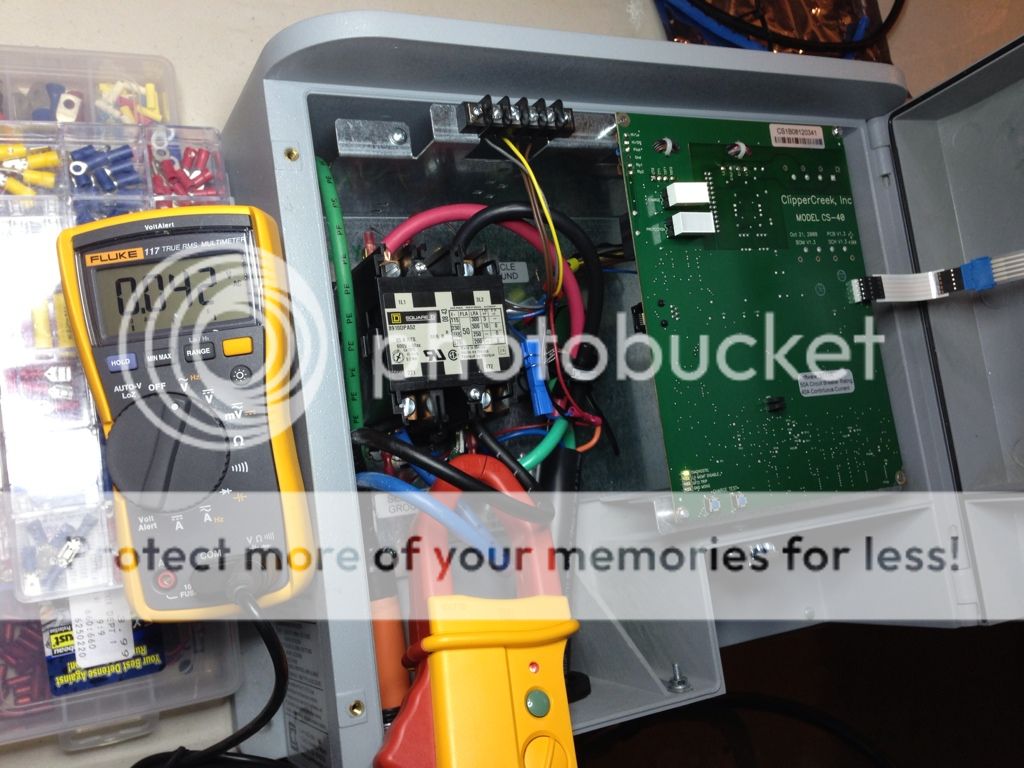
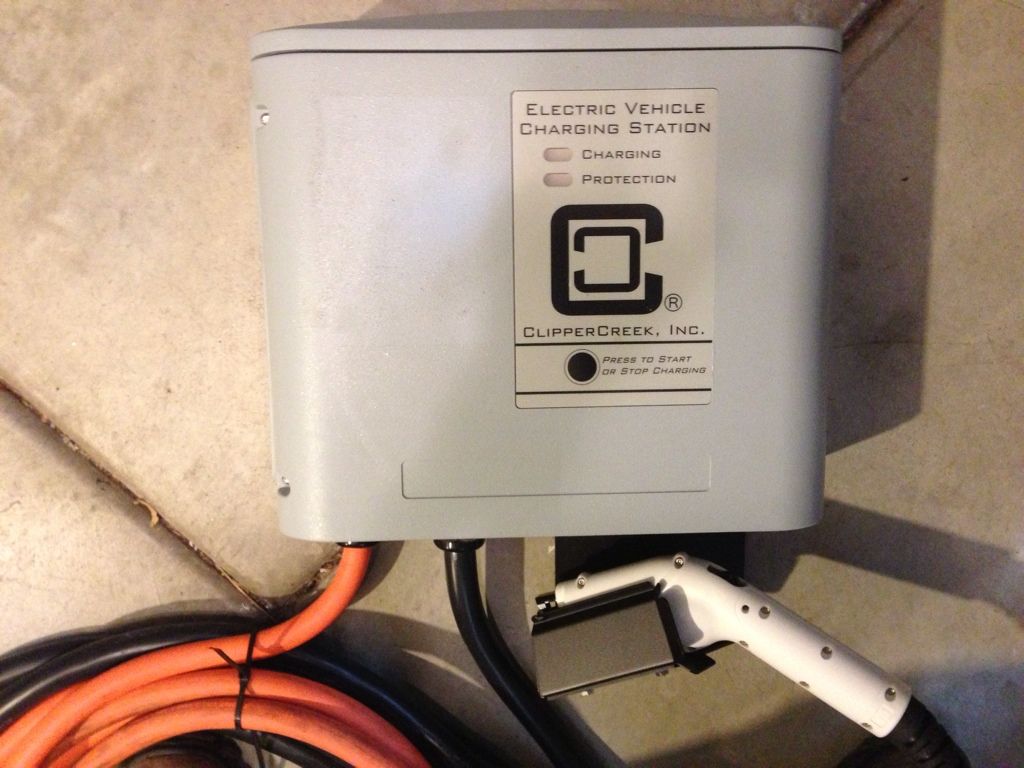
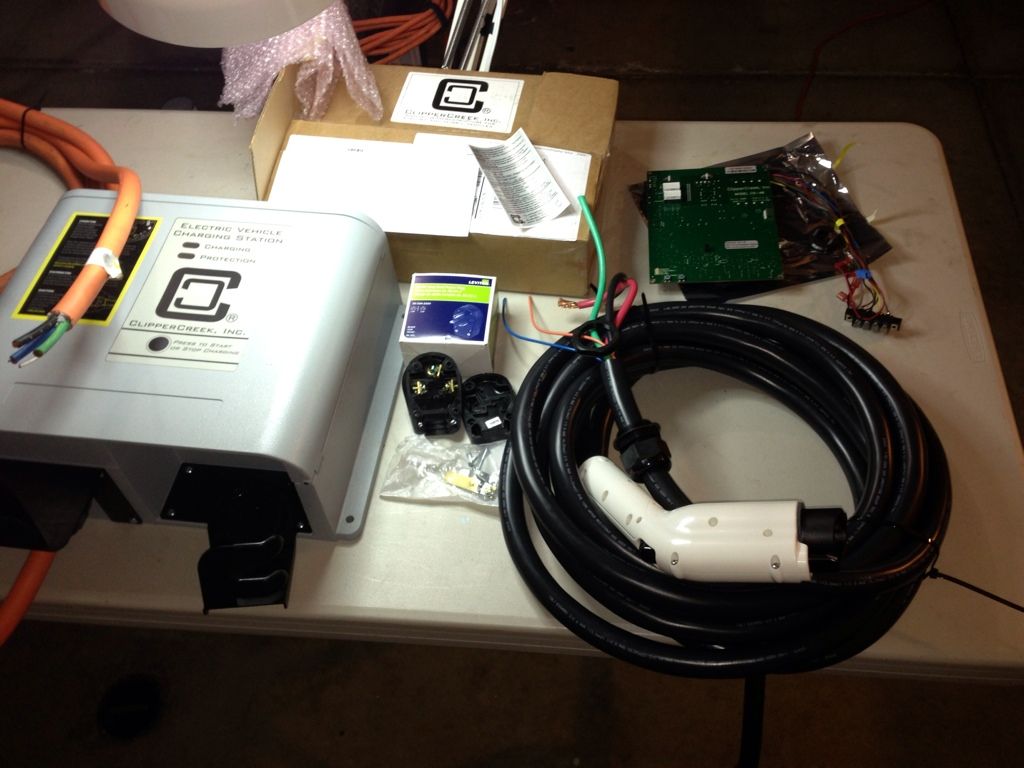
I acquired an old (yes, 2008 is old in the EV world) BMW Mini-E configured Clipper Creek 30 amp EVSE. The BMW proprietary car connector had been removed, but the shielded charging cord was attached. I plan to use that as my power supply cord. I got a new ITT brand 75 amp rated J1772-2009 connector and 18-ish feet of wires (about $250) as my new charging cord.

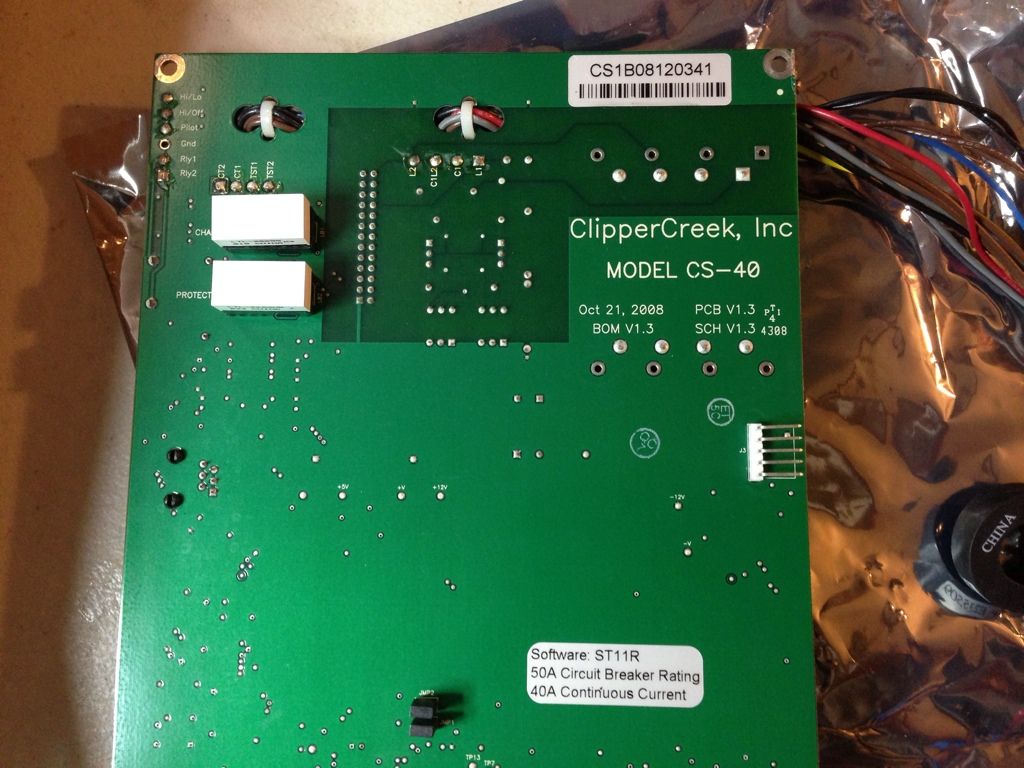
I had sent the mother board back to the Clipper Creek factory to be reprogrammed from 30 amps to 40 amps (about $50). This had a one week turn around and arrived yesterday. It came with a new sticker to identify the box as modified to 40 amp continuous service. I need 40 amps so that I can charge my Rav4 inside the 5 hour window available for my "super off peak" Time-Of-Use rate of 7.7 cents from midnight until 5am (Rav4 uses a single 40 amp Tesla charger, 10kW at 250 volts).

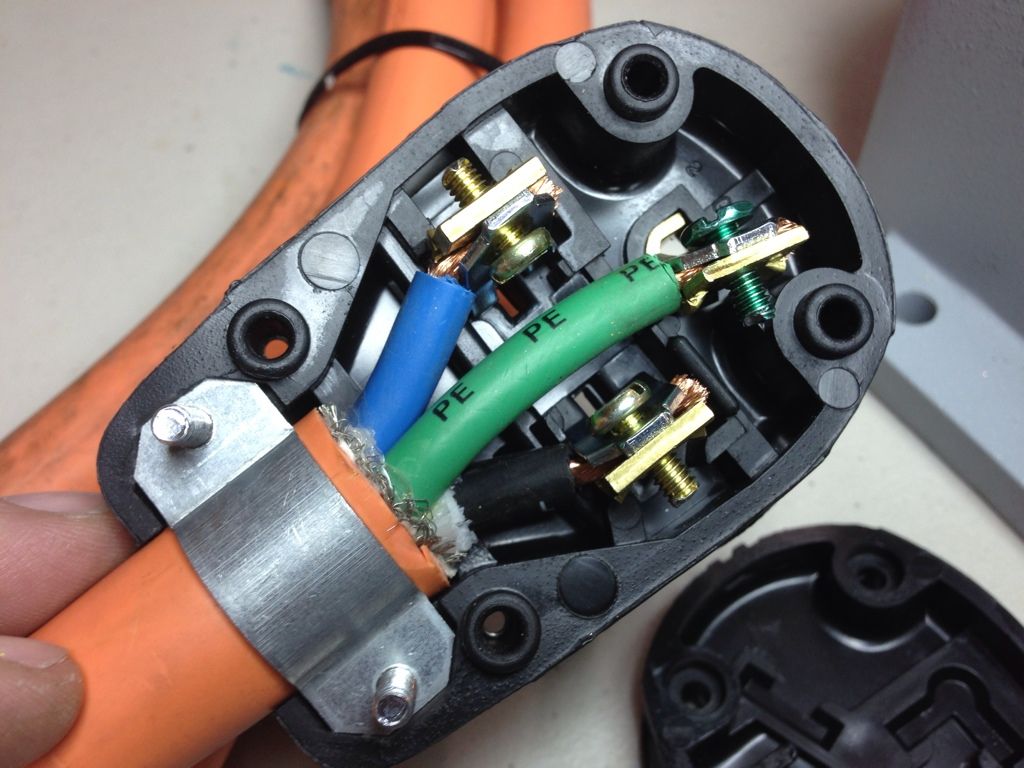
I bought a new Leviton NEMA 6-50P plug to put on the power cord ($15). Since I got the EVSE unit for free, my total expenses are about $315 to modify it. This is a great project, since it recycles something that might have been discarded, it only requires very simple hand tools and only takes a few hours:

1BEA3E07-E5DE-450C-B716-5F5D2747C655-6208-000003E1FD33CC6B.jpg


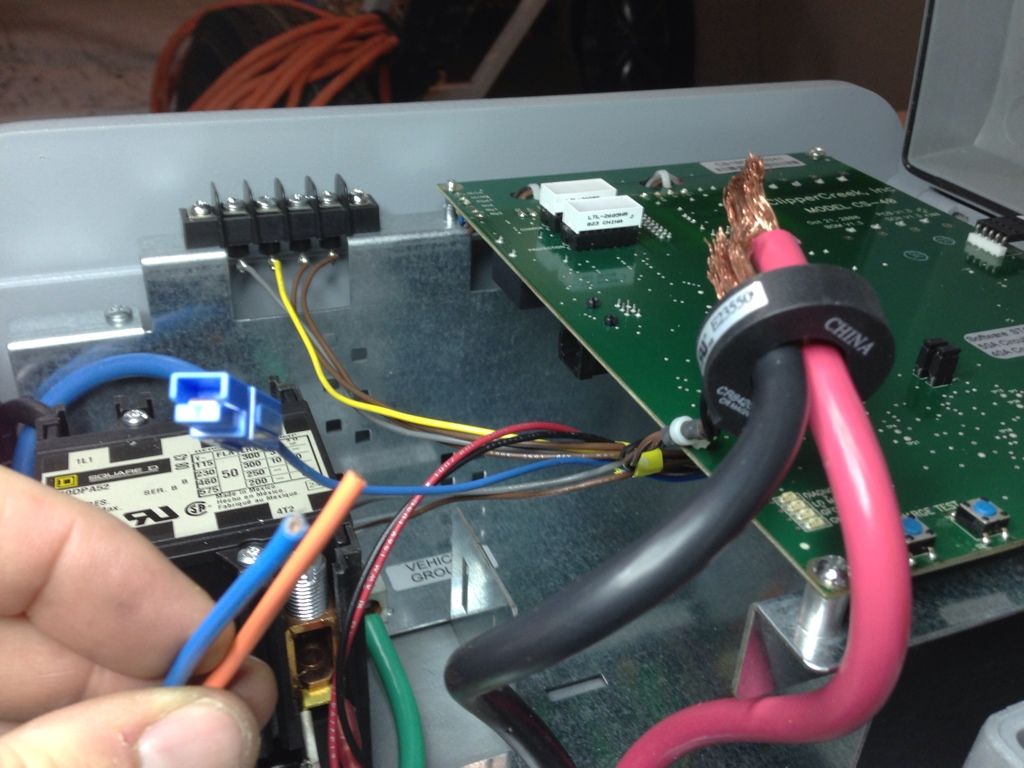
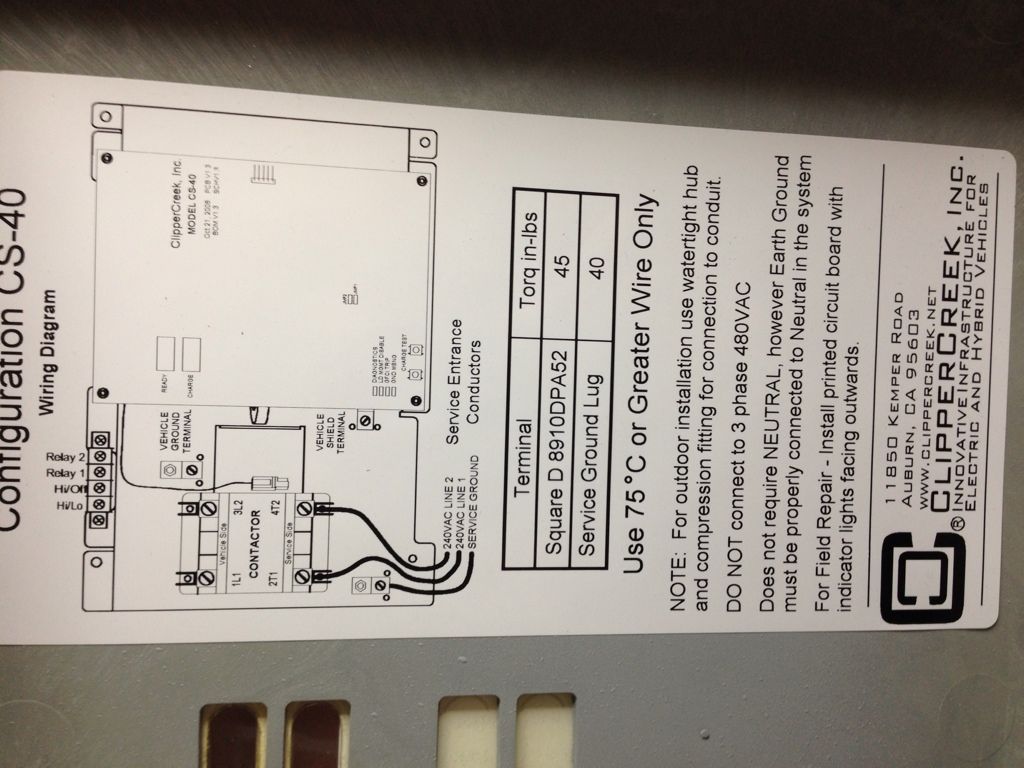
The inside in the EVSE has a simple schematic:

AA0DA98C-974D-46CD-9CD0-D3470923B84B-6208-000003E1E02EC7AA.jpg


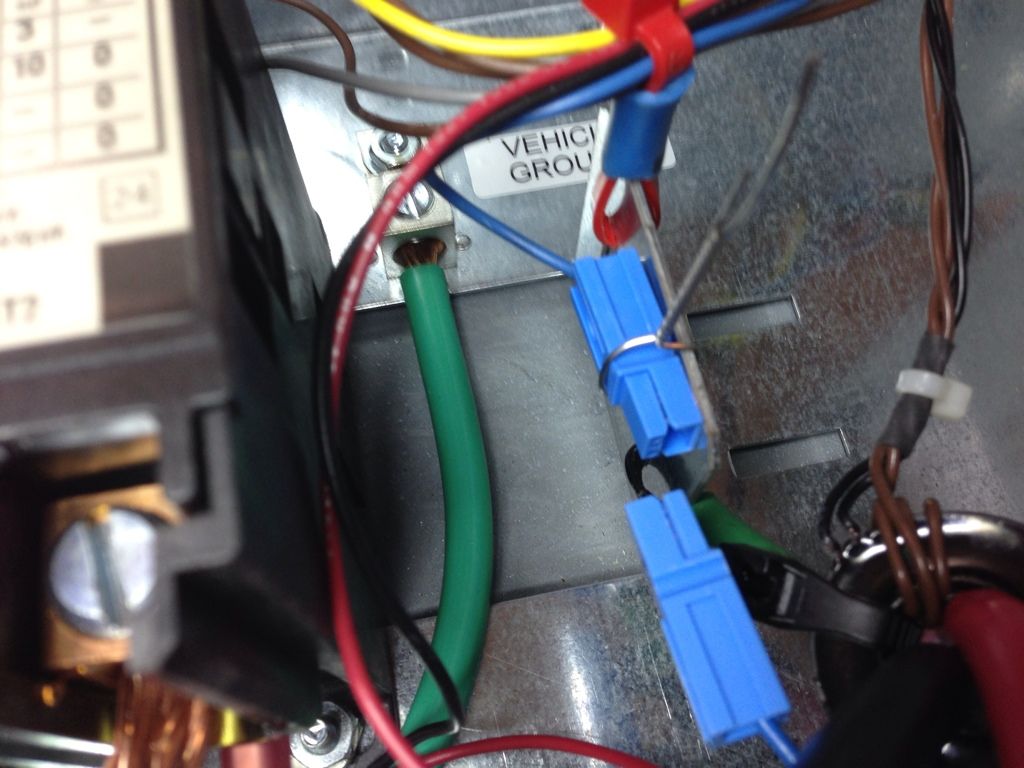
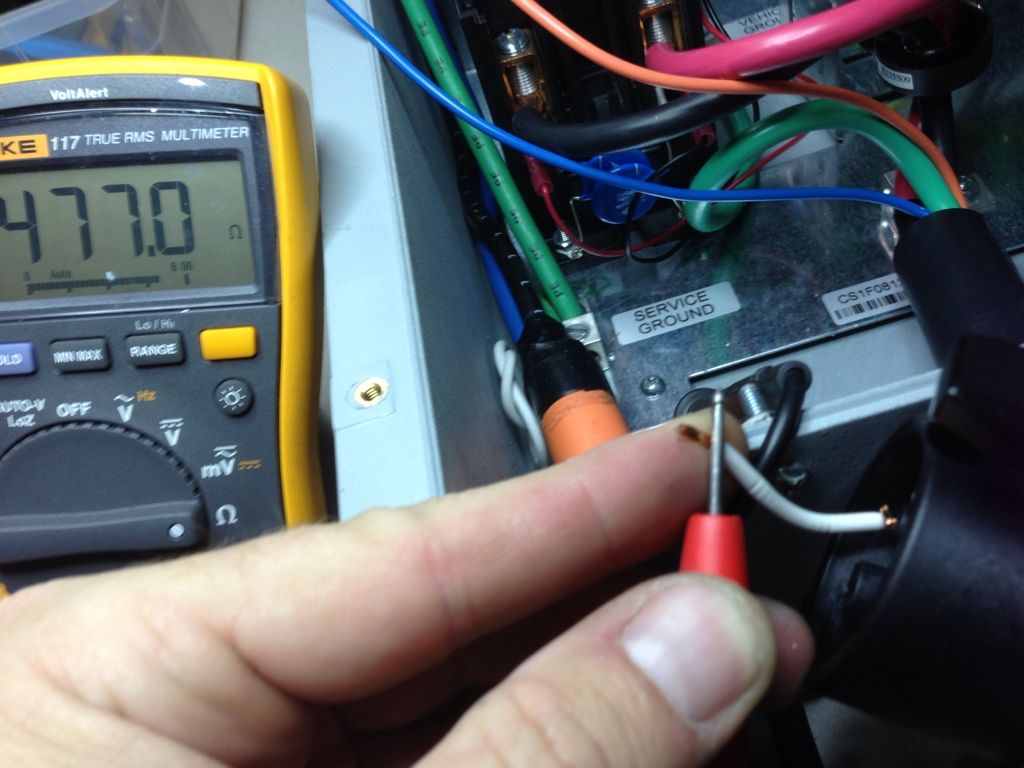
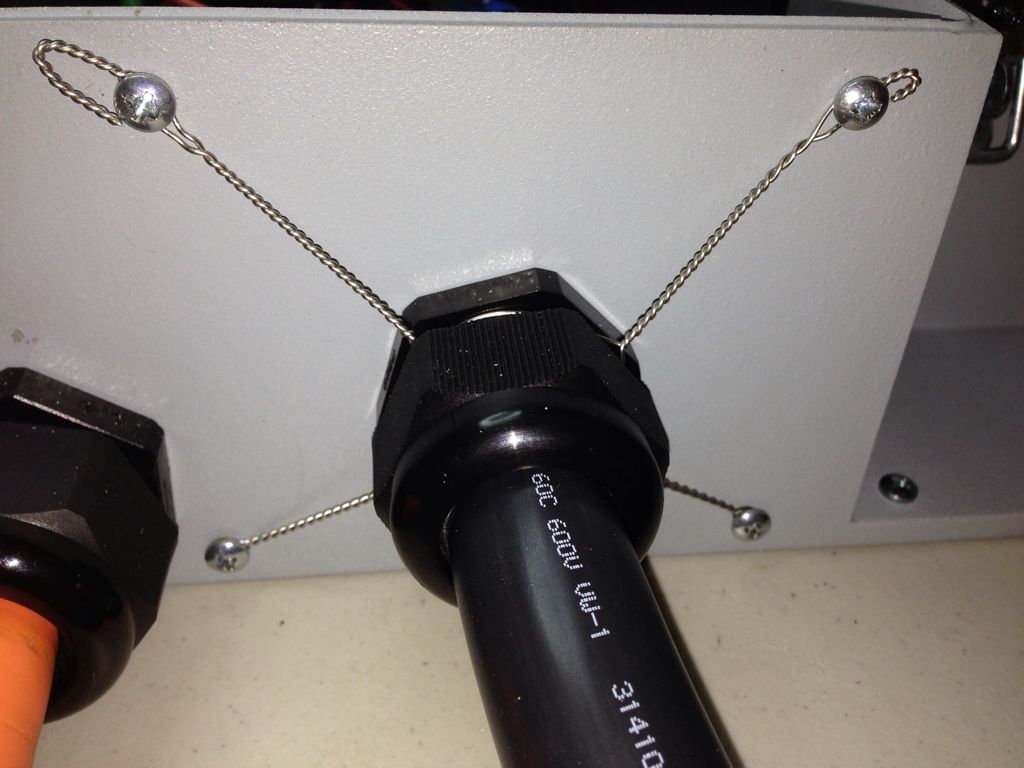
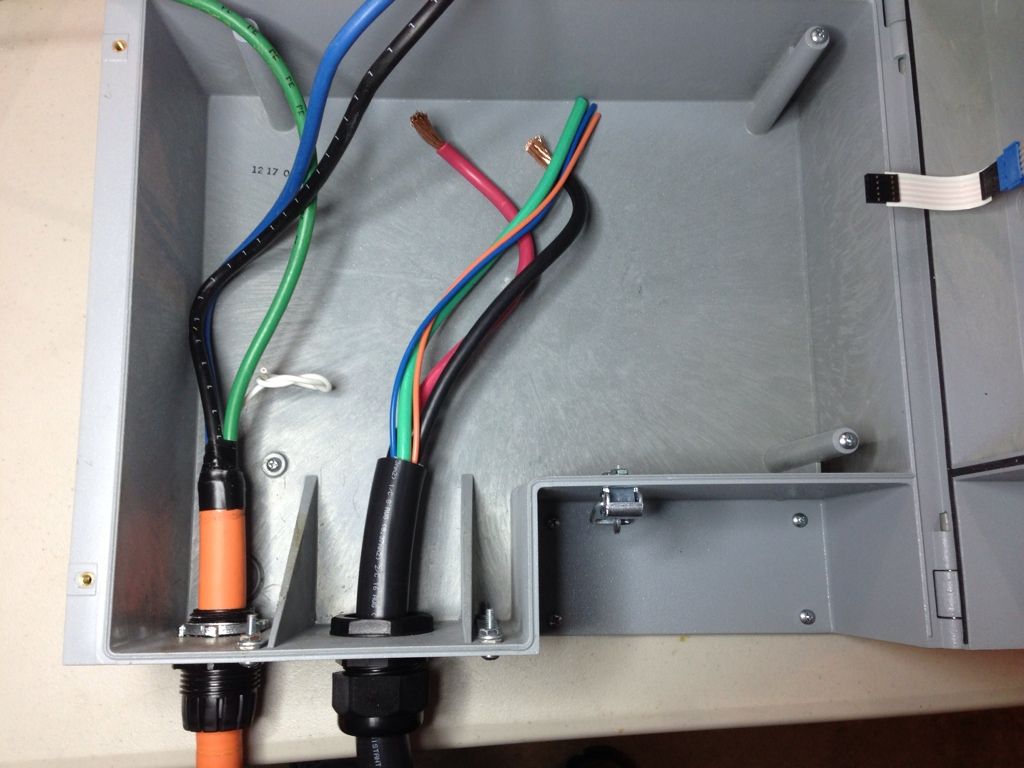
I took everything out of the box and cleaned it. There was plenty of lose bits floating around in there (including metal strands that can short something). I installed the power cord with its new plug, and installed the J1772 cable in the he next to it. Since this 75 amp rated charge cord is a bit larger than the original one, I had to make the inlet hole bigger with a file. The same was true of the power cord inlet; this cord was bigger than the original hole. A Dremel tool would make this faster.

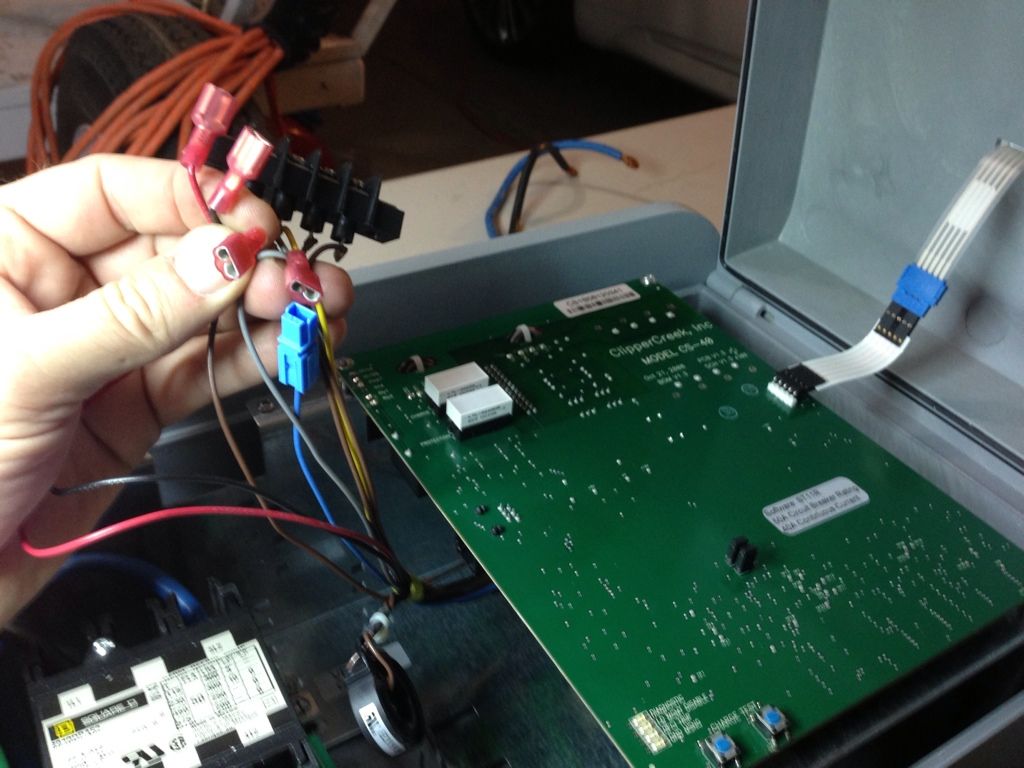
The ribbon wire in the box goes to the mother board for the ON/OFF switch.

F5DFF07E-D883-4E14-87A4-B2502467AB5B-6208-000003E1B273CADD.jpg


CFCE4E3E-CAF7-464D-AD62-CC7769CA4B6C-6208-000003E1BBB85A92.jpg
 
Nice! Good set-up.

Where did you get the CS-40? Are there more of those Mini-E project leftovers floating around?
 
TEG said:
Nice! Good set-up.

Where did you get the CS-40? Are there more of those Mini-E project leftovers floating around?

I'm sure there are!! I got mine from a previous owner.

I reinstalled the shiny metal ground plane / mounting bracket and 65 amp relay. Just four Phillips head acres hold it. I also removed all the black brackets the wont work for J1772. I'm holding the blue Anderson "easy disconnect" connector for the pilot signal. This is designed to disconnect and unpower the high voltage when the cord gets ripped out of the box (when a charging car is put in neutral and rolls away while still plugged in).


9C769D11-DB62-4D3A-BC00-725965708AA4-6208-000003E1D1BA6BED.jpg


Here's where I attached the other end of the pilot signal easy-disconnect. This will make sure it actually will disconnect then other end. I ended up using two wraps of .025 stainless safety wire:


EECE9A93-B0BB-4587-ACFE-BE0F25C04C5A-6208-000003E198966CCB.jpg
 
Here's the two control wires from the ITT J1772 assembly. One is for the pilot signal (to communicate how many amps) and the other is the proximity sensor (is the car plugged in). Blue and orange.

The Clipper Creek has a blue connector and blue wire for pilot, so that would be my first guess. Wrong. It is the orange one.

The Hall effect sensor goes through both of the red and black 120 volt conductors that make up 240 volts.


14AB2A4E-57BF-4D31-B0E1-F7FF9E4E371D-6208-000003E17D227550.jpg


Testing the proximity sensor. The (blue) wire from the J1772 doesn't actually connect to anything, because the resistors are in the handle. When you press the thumb button on the J1772, you get this value measured from ground:


D631A22D-83A0-4136-91D5-11D7C814DFC6-6208-000003E18C0169E0.jpg


Otherwise, the static value for the prox sensor is:


09F959BC-8A6D-4385-84D6-ACDDE35E2DAE-6208-000003E184237F43.jpg
 
Do you intend to finish the project and charge with the upgraded ClipperCreek station tonight? There is an "official" J1772 upgrade kit available for it. Tom Moloughney installed three of them, that's how I learned about it. Although, by the looks of it, it's just a 30-amp cord set and a few mechanical parts. I like the 40-amp board upgrade, very neat.

ClipperCreek said:
This kit includes everything you need to convert your CS-40 from the BMW Mini-E program to the J1772 standard CS-40. The kit includes:
UL Listed at 30 Amps, 240 V J1772 Cable
25’ of cable prepared for installation
Connector Holster (holder)
Cable strain nut


Click to open
1
 
Looks good Tony. Just wondering if it has a 65A contactor, and you used a 75A rated ITT J-1772 cable, why you didn't have Clipper Greek setup the Pilot signal on the PCB to 60A, which is their "CS-60" I believe. Just a thought if you get the Model S as well with dual chargers, you would be able to use some capacity of the 2nd 10KW onboard charger (if you are getting the 2nd charger on your Model S)

Of course you would have to hard wire it at that point, as there very few 60A AC outlets/ plugs
 
surfingslovak said:
ClipperCreek said:
This kit includes everything you need to convert your CS-40 from the BMW Mini-E program to the J1772 standard CS-40. The kit includes:
UL Listed at 30 Amps, 240 V J1772 Cable
25’ of cable prepared for installation
Connector Holster (holder)
Cable strain nut

This kit does not supply the 75 amp cable (30 amp only), nor does it include the reprogramming the board to 40 amp. I will try and buy the "holster" bracket, if the price is right.

I'm still far cheaper than the kit, with upgraded stuff.
 
mitch672 said:
Looks good Tony. Just wondering if it has a 65A contactor, and you used a 75A rated ITT J-1772 cable, why you didn't have Clipper Greek setup the Pilot signal on the PCB to 60A, which is their "CS-60" I believe. Just a thought if you get the Model S as well with dual chargers, you would be able to use some capacity of the 2nd 10KW onboard charger (if you are getting the 2nd charger on your Model S)

Of course you would have to hard wire it at that point, as there very few 60A AC outlets/ plugs

I originally considered that, but it came down to two things. I would have to block out additional amps in my breaker box that I'm not using today (50 amp today versus 60 amp for the 48 amp continuous CS-60) and pay for a $150 relay.

When a model S arrives, I need to swap out the breaker to 100 amps ($50), pull through the 3 gauge "welding cables" $20-$40) and swap the 65 amp relay for a 75-80 amp one ($150).

And, of course, either reprogram the Clipper Creek card for 75 amps ($50) or "upgrade" to OPENevse Plus with selectable amp delivery ($150).
 
The upgraded board gets a sticker to match the sticker that went on the outside of the unit (to reflect 40 amps continuous). The two rectangular lights on the board are the "charging" light (upper) and "fault" (lower).


F56CBB3D-F0AC-4569-9E18-AB3B25B03EAC-6208-000003E1C66280F9.jpg


There are four insulated female spade connectors that attached to the relay and the blue pilot wire. I don't have any idea what the termination block is for. There was nothing connected to any of the 4 or 5 wires. Maybe lugs for billing?


BA753797-75A3-4E71-BA8E-41988F029FB1-6208-000003E1AA37042C.jpg
 
Ok, I had a little problem. The strain relief for this wire wasn't long enough to have exposed threads to get a nut on. So, until I get a proper one, I safety wired it on.


2222B706-CC4E-466A-ACD8-4E0DEA97D8A6-6208-000003E1751A485C.jpg


And here it is pumping out 42 amps in my Rav4. This took about 4 hours to build. Now I can pump a full tank of electrons in 5 hours.


223E3FA4-BA26-454B-8A1F-2AEC5F95F27F-6208-000003E22AFCDF15.jpg
 
TonyWilliams said:
This kit does not supply the 75 amp cable (30 amp only), nor does it include the reprogramming the board to 40 amp. I will try and buy the "holster" bracket, if the price is right.

I'm still far cheaper than the kit, with upgraded stuff.
Yes, absolutely. The upgrade kit is just a 1:1 cable replacement, and an expensive one at that. It would be great to see your project documented in the Wiki, it wold be a shame for it to get lost in the noise here. There are plenty of old ClipperCreek Avcons floating around. I wonder if they could be upgraded and modified just as easily.

TonyWilliams said:
And here it is pumping out 42 amps in my Rav4. This took about 4 hours to build. Now I can pump a full tank of electrons in 5 hours.
Well done, congrats! Does this mean that the upgraded ClipperCreek station is providing close to 10 kW output and maxing out the RAV4 onboard charger?
 
surfingslovak said:
TonyWilliams said:
This kit does not supply the 75 amp cable (30 amp only), nor does it include the reprogramming the board to 40 amp. I will try and buy the "holster" bracket, if the price is right.

I'm still far cheaper than the kit, with upgraded stuff.
Yes, absolutely. The upgrade kit is just a 1:1 cable replacement, and an expensive one at that. It would be great to see your project documented in the Wiki, it wold be a shame for it to get lost in the noise here. There are plenty of old ClipperCreek Avcons floating around. I wonder if they could be upgraded and modified just as easily.

I used the Clipper Creek in Old Town Temecula today. It had the nice holster, which I hope will fit the ITT handle (it looks like the CC one is either a Yazaki, or Yazaki clone).

Yes, maybe in the OpenEVSE site, since that's where folks might look who are inclined to do this.


Well done, congrats! Does this mean that the upgraded ClipperCreek station is providing close to 10 kW output and maxing out the RAV4 onboard charger?

That is maximum. 9600 watts at 240 volt. It's a huge difference from 6200 on public 208v/30amp charging stations.
 
I added the $50 handle holder from Clipper Creek. It fits the ITT handle VERY well, and latches on (just like it would latch on to the car when charging).

Very pleased with this purchase, so now I'm considering another $50 for their cord hanger. I suspect it won't come close to fitting my cords. It may be smarter to modify the existing hangar (not pictured here).

7B2018BE-52DF-4FFC-AF3B-1E3E0B568D8E-1253-0000007DEA1CFC5F.jpg
 
TonyWilliams said:
I added the $50 handle holder from Clipper Creek. It fits the ITT handle VERY well, and latches on (just like it would latch on to the car when charging).

Very pleased with this purchase, so now I'm considering another $50 for their cord hanger. I suspect it won't come close to fitting my cords. It may be smarter to modify the existing hangar (not pictured here).
Good job Tony!! Where do you get the CC handle holder and cord hanger? Do you mind to share the link? Pretty please..
 
waidy said:
TonyWilliams said:
I added the $50 handle holder from Clipper Creek. It fits the ITT handle VERY well, and latches on (just like it would latch on to the car when charging).

Very pleased with this purchase, so now I'm considering another $50 for their cord hanger. I suspect it won't come close to fitting my cords. It may be smarter to modify the existing hangar (not pictured here).
Good job Tony!! Where do you get the CC handle holder and cord hanger? Do you mind to share the link? Pretty please..


Since you're using the same ITT 75 amp J1772 plug, it should work great. You can bolt it directly to a vertical wall, with four bolts. Of course, you'll want those bolts in studs.


5 5/16 inch wide bolt holes, center to center
2 inch high, center to center


I did not use the hangar, because that cord is WAY too heavy for it. Plus, it mounts horizontal instead of vertical, and your box isn't strong enough to have a heavy cord mounted to it. I would use a garden hose hanger from the hardware store.

For the J1772 holster, call Will at:

BY mail:
11850 Kemper Rd #E
Auburn, CA 95603
BY Phone: 530-887-1674
By Fax: 530-887-8527
By Email: [email protected]
 
TonyWilliams said:
Since you're using the same ITT 75 amp J1772 plug, it should work great. You can bolt it directly to a vertical wall, with four bolts. Of course, you'll want those bolts in studs.

5 5/16 inch wide bolt holes, center to center
2 inch high, center to center

I did not use the hangar, because that cord is WAY too heavy for it. Plus, it mounts horizontal instead of vertical, and your box isn't strong enough to have a heavy cord mounted to it. I would use a garden hose hanger from the hardware store.

For the J1772 holster, call Will at:

BY mail:
11850 Kemper Rd #E
Auburn, CA 95603
BY Phone: 530-887-1674
By Fax: 530-887-8527
By Email: [email protected]
Great! Thank you so much.
 
http://www.ebay.com/itm/261172628029?ssPageName=STRK:MEWNX:IT&_trksid=p3984.m1439.l2649" onclick="window.open(this.href);return false;

Looks like some Clipper Creek 60 A units are also floating around out there. For the extra$$ I decided in investing in this one for the heavier cable and "future proofing").

Of course, will require new wires in the wall, as my 50A welder plug will no longer suffice.
 
Back
Top